Howto forge released a good tutorial on resizing your ext3 partitions
without loosing any data on it. It covers shrinking,enlarging and
merging of ext3 partitions. If you don’t don’t use LVM then this
tutorial would be good for you.
Access the tutorial here.
Howto forge homepage.
Tuesday, November 27, 2012
Setting the root password on MySQL
I just installed MySQL version 4.1.20 on my CentOS 4.4
server. The default install of MySQL server uses a blank password for
root so I had to have it changed. I also set the MySQL service to start
up every time my machine boots up.
This is how I did it;
Method 1
1. # yum -y install mysql-server (This will install the mysql binaries)
2. # chkconfig mysqld on (Adds mysqld to the startup services)
3. # service mysqld start (Starts the MySQL server)
4. # mysql -u root@localhost (Brings up the MySQL console)
5. #mysql> set password for root=password(‘password’); (Sets the root password to “password”)
6. #mysql> reload privileges; (Reloads the grant tables)
Method 2
1. # mysql -u root (Brings up the MySQL console)
2. #mysql> use mysql (Use the mysql database)
3. #mysql> update user
-> set password=password(“password”) (Sets the root password to “password”)
-> where user=”root”;
4. # reload privileges; (Reloads the grant tables)
That’s it, the next time you want to get the MySQL console up you’ll have to run #mysql -u root -p to get the password prompt.
Post-Installation Setup and Testing at MySQL
Update:
This will work too.
/usr/bin/mysqladmin -u root password ‘new-password’
/usr/bin/mysqladmin -u root -h pandora.crib password ‘new-password’
.htaccess password generator
Use this tool at Dynamic Drive
to automatically generate all the code needed to protect a directory on
your site. Below are the 2 files generated by the tool. .htaccess goes
into the folder that you want to protect and .htpasswd should be in a
folder not accessible from the web. I normally put my .htpasswd file in
my apache’s base folder.
.htaccess file
.htpasswd file
Get the tool here.
.htaccess file
AuthName "Restricted Area"

AuthType Basic

AuthUserFile /home/mydir/.htpasswd

AuthGroupFile /dev/null

require valid-user
.htpasswd file
danny:8UAaVrlw.58f6Get the tool here.
Screen | Linux Command
When you run commands and programs in a command prompt on Linux, the
programs or commands only run while the command prompt session is open
but as soon as the command prompt session is terminated for whatever
reason, the commands or programs running within the command prompt
session will also get terminated.
I use wget to download files from the internet using my putty console all the time. Imagine downloading a 500mb file and then suddenly putty crashes causing my session to terminate along with it. There goes my 500mb file download!! I so wished I had known about the “Screen” program then.
The screen program is a magnificent utility. Screen basically starts a session within the the session that you logged in with. So, if your putty session suddenly crashed don’t worry, the screen session would still be running in the background. Log in again to the server using putty and you should be able to retrieve the screen session you initiated earlier.
# screen
This starts a screen session.
# Ctrl + A followed by D
This will detach your screen session and return you to the original session you logged in with. Your screen session will now be running in the background.
# screen -r
This command will resume your previous screen session.
# Ctrl + A followed by Ctrl + (back slash)
# exit
You could run either command above to end a screen session.
# Ctrl + A followed by “
This command will list all the available screen sessions running if there are.
Usefull Links:
O’REILLY Linux Command Directory
Inside Open Source
-bash: /usr/bin/crontab: Permission denied
” -bash: /usr/bin/crontab: Permission denied “.
I was getting this error earlier today while trying to add cron jobs for my login on my SLES 10 box at work. Turns out that all users in SLES 10 by default have no access to cron.
The fix is to add the user to the “trusted” group in the group file (/etc/group). Let’s assume mu login is “elf”.
1. Make sure you are “root”.
2. #usermod -G trusted elf
This will add the user to the “trusted” group.
3. #id elf
Display groups the user belongs to. Make sure “trusted” is on the list too.
The output might look like this. “uid=502(danny) gid=502(users) groups=502(elf),11(trusted)”
4. #su – elf
Change user
5. #crontab -e
Add/Remove/Edit user cron jobs.
6. #crontab -l
List user scheduled cron jobs
Please do comment if you have an alternative way to accomplish this or if I made a mistake.
Bash and command line keyboard shortcuts
Shortcut keys for the bash and commad line interface.
Ctrl + A – Moves cursor to begining of line.
Ctrl + E – Moves cursor to end fo line.
Ctrl + K – Clears command line from cursor position till end of line.
Ctrl + U – Clears command line from cursor position till begining of line.
Ctrl + W – Clears first word to the left from cursor position.
Ctrl + Y – Paste any value previously deleted by Ctrl+K,Ctrl+U and Ctrl+W.
Tab Key – Auto compelte a partial typed command.
Ctrl + R – Followed by characters with search through the recent command history.
Crtl + D – Quits bash if used in a blank command line.
Ctrl + L – Screen refresh.
Ctrl + C – Kills current process.
Ctrl + Z – Suspend a process. Use command “bg” to execute the process in the background and “fg” to bring the process back to the foreground. The command “jobs” will list the available processes you can manipulate.
That’s it. Hope the commands help you. If i missed out anything please do comment.
SSH Tunneling with Putty | Linux
SSH tunneling or also known as port forwarding is a way of forwarding
normally insecure TCP traffic through SSH. Common ports for example
POP3,SMTP,HTTP and FTP can be easily tunneled using SSH.
SSH tunneling is also sometimes used to bypass firewalls where certain ports are blocked.
The figure below represents the network setup at my workplace where the only port available to use is SSH port 22. By implementing portwarding over ssh I am able to port forward Oracle traffic over port 22 to my Oracle DB database running on my private VM with host only networking enabled.

In this post I will show you how to apply SSH tunneling using the windows SSH client Putty. I’ll cover the Linux implementation in my future post.
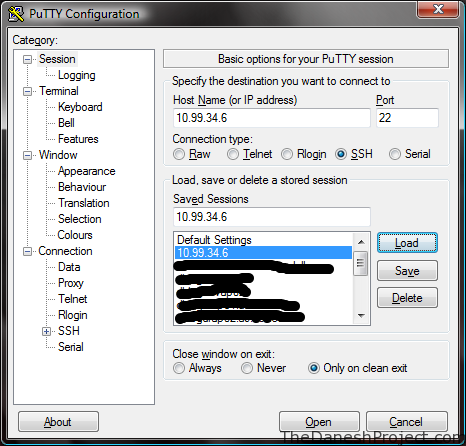
You will need Putty to get started. Putty is a popular free win32 based SSH/Telnet client. Obtain the latest version 0.59 at the homepage.
Putty Home | Putty Download
Run Putty, key in the address for your Linux box. In this example “10.99.34.6″ “Pandora” is the Linux box hosting VM and on the VM “192.168.66.100″ the is an Oracle database running on RHEL 3. The VM is setup with host only networking so it has no access beyond the host machine “Pandora”.

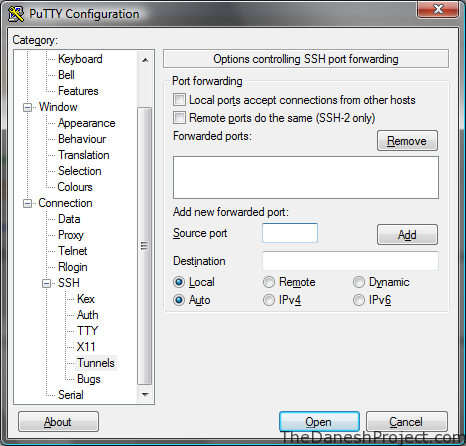
Look for the SSH tree entry in the menu to the left. Expand it and go to “Tunnels”.

Fill the the required information and click add.
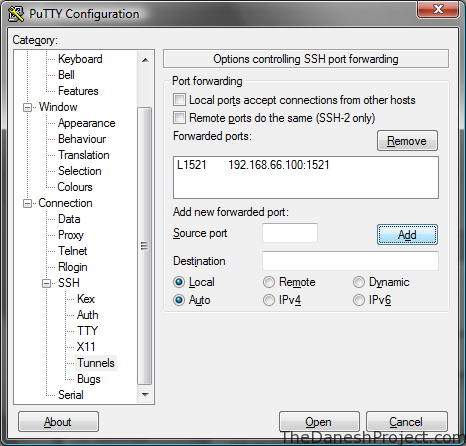
Source Port: 1521
Destination: 192.168.66.100:1521
“Source port” is the port Putty will listen on for incoming connections.
“Destination” is the destination port we are trying to access. In this example the Oracle listener is listening on port 1521 for incoming traffic so we use that.
“1521″ is the standard Oracle listener port.

Remember to save the session in the session page.
Open Putty and login to the Linux box “Pandora” and port forwarding should be up.
That’s it, have fun.
SSH tunneling is also sometimes used to bypass firewalls where certain ports are blocked.
The figure below represents the network setup at my workplace where the only port available to use is SSH port 22. By implementing portwarding over ssh I am able to port forward Oracle traffic over port 22 to my Oracle DB database running on my private VM with host only networking enabled.
In this post I will show you how to apply SSH tunneling using the windows SSH client Putty. I’ll cover the Linux implementation in my future post.
You will need Putty to get started. Putty is a popular free win32 based SSH/Telnet client. Obtain the latest version 0.59 at the homepage.
Putty Home | Putty Download
Run Putty, key in the address for your Linux box. In this example “10.99.34.6″ “Pandora” is the Linux box hosting VM and on the VM “192.168.66.100″ the is an Oracle database running on RHEL 3. The VM is setup with host only networking so it has no access beyond the host machine “Pandora”.
Look for the SSH tree entry in the menu to the left. Expand it and go to “Tunnels”.
Fill the the required information and click add.
Source Port: 1521
Destination: 192.168.66.100:1521
“Source port” is the port Putty will listen on for incoming connections.
“Destination” is the destination port we are trying to access. In this example the Oracle listener is listening on port 1521 for incoming traffic so we use that.
“1521″ is the standard Oracle listener port.
Remember to save the session in the session page.
Open Putty and login to the Linux box “Pandora” and port forwarding should be up.
That’s it, have fun.
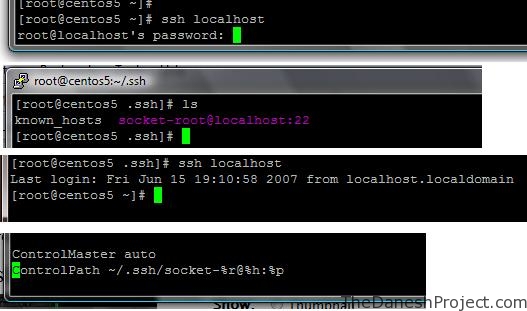
Duplicate ssh sessions without password prompt
I work with multiple ssh sessions whenever I connect to a server.
Typically I would have about 3 sessions initiated from my host machine
to the destination server.
Found away to duplicate my session without retyping my password every time I initiate a connection the the server from my host machine thanks to Linux By Examples.
Add the following 2 lines to your /etc/ssh/ssh_config file and feature will be ready for you to use once you restart the sshd service.
ControlMaster auto
ControlPath ~/.ssh/socket-%r@%h:%p

ControlMaster
Enables the sharing of multiple sessions over a single
network connection.  When set to “yes” ssh will
listen for connections on a control socket specified
using the ControlPath argument. Additional sessions
can connect to this socket using the same ControlPath
with ControlMaster set to “no” (the default). These
sessions will reuse the master instance’s network con-
nection rather than initiating new ones. Setting this
to “ask” will cause ssh to listen for control connec-
tions, but require confirmation using the SSH_ASKPASS
program before they are accepted (see ssh-add(1) for
details).
ControlPath
Specify the path to the control socket used for
connection sharing. See ControlMaster above.
Found away to duplicate my session without retyping my password every time I initiate a connection the the server from my host machine thanks to Linux By Examples.
Add the following 2 lines to your /etc/ssh/ssh_config file and feature will be ready for you to use once you restart the sshd service.
ControlMaster auto
ControlPath ~/.ssh/socket-%r@%h:%p
ControlMaster
Enables the sharing of multiple sessions over a single
network connection.  When set to “yes” ssh will
listen for connections on a control socket specified
using the ControlPath argument. Additional sessions
can connect to this socket using the same ControlPath
with ControlMaster set to “no” (the default). These
sessions will reuse the master instance’s network con-
nection rather than initiating new ones. Setting this
to “ask” will cause ssh to listen for control connec-
tions, but require confirmation using the SSH_ASKPASS
program before they are accepted (see ssh-add(1) for
details).
ControlPath
Specify the path to the control socket used for
connection sharing. See ControlMaster above.
How to change the hostname in Linux
Changing your Linux machine’s hostname is easy. Just follow the steps below.
root# hostname [new-host-name]
root# vi /etc/sysconfig/network
HOSTNAME=[new-host-name]
root# vi /etc/hosts
Make sure your new host is updated in the hosts file.
root# service network restart
Done!!
root# hostname [new-host-name]
root# vi /etc/sysconfig/network
HOSTNAME=[new-host-name]
root# vi /etc/hosts
Make sure your new host is updated in the hosts file.
root# service network restart
Done!!
Extract rar files in Linux
RAR is a proprietary compression format widely used today. It’s supposedly has 30% higher compression rate when compared with WinZip. If you download large torrent then chances are you are are already well acquainted with RAR.
I use RAR on my Windows and Linux boxes everyday and today I’ll show you how to extract RAR files from the Linux command line.
In Linux, to extract a RAR file you would use the unrar command. The unrar binaries are typically not included with the default Linux install so you will have to install them either through the package manager or by downloading binaries from rarlab.com
Let’s get to the HowTo now,
Extract a RAR file into the curren directory.
# unrar e [filename].rarExtract a RAR file with the full file path.
# unrar x [filename].rarList contents of a RAR file
# unrar l [filename].rarTest intergruty of a RAR file
# unrar t [filename].rarIf you face any problems obtaining,installing or using unrar please contact me. I will be glad to help.
Shell script scripts to restart firefox
My Firefox freezes up when I have too many flash videos loading at
the same time. Wrote a simple script to restart Firefox every time this
happens.
I will be adding more functionality to the script in the future. Once sure feature will be the ability to choose either to kill all running instances or just kill a specific instance.#!/bin/bash
#simple script to kill and restart firefox
#20th August 2007
#Writen by Danesh aka Danny
#http://thedaneshproject.com
#
#look for the firefox PID
PID=`ps -ef | grep firefox-bin | grep -v grep | awk ‘{print $2}’`
#locate firefox executable
FIRE=`which firefox`
#kill firefox
CMD=�kill -9 $PID�
`$CMD`
#pause for 2 seconds
`sleep 2`
#start firefox
CMD=�$FIRE�
`$CMD &`
#End of script
Extract ZIP files in Linux
ZIP archives are most commonly used in Windows/MS-DOS based environments.
In Linux, you can use the “unzip” command to extract,list or test ZIP files. Below are the common tasks I use “unzip” for.
Extract the contents of a ZIP file into it’s own directory and also create subdirectories as needed.
In Linux, you can use the “unzip” command to extract,list or test ZIP files. Below are the common tasks I use “unzip” for.
Extract the contents of a ZIP file into it’s own directory and also create subdirectories as needed.
# unzip [filename].zipExtract the contents of a ZIP file into the current directory only. No subdirectories will be created.
# unzip -j [filename].zipExtract the contents of a ZIp file into a custom directory.
# unzip -d [target directory] [filename].zipList the contents of a ZIP file.
# unzip -l [filename].zipTest the integrity of a ZIP file and it’s contents.
 # unzip -t [filename].zipExtract the contents of a ZIP file only if the files already exist in the target directory. Good for upgrades.
# unzip -tq [filename].zip (Only shows summary)
# unzip -f [filename].zipExtract the contents of a ZIP file if the contents are newer then what’s available in the target directory or don’t exist yet. Good for upgrades.
# unzip -fo [filename].zip (non interactive. Yes to all)
# unzip -u [filename].zipDid this help? If you need further information please drop me a comment.
# unzip -uo [filename].zip (non interactive. Yes to all)
Users, Shutdowns and Reboots
The “last” command. Not many people I know use it but there are a
quite a few things one could do with it often. Let’s look at users,
shutdowns and reboots.
The “last or lastb” command is typically used to show a listing of the last logged in/out users. To view when a particular user last logged in run “last [username]“. See output below.
The “last or lastb” command is typically used to show a listing of the last logged in/out users. To view when a particular user last logged in run “last [username]“. See output below.
[root@nosebleed ~]# last danny
danny    pts/1        ftmtj1s.crib     Wed Oct 24 16:51   still logged in
danny    pts/0        python.crib      Wed Oct 24 16:10   still logged in
danny    pts/0        ftmtj1s.crib     Wed Oct 24 14:44 - crash  (01:07)
danny    pts/0        python.crib      Tue Oct 23 16:59 - 17:22  (00:22)
danny    pts/2        python.crib      Tue Oct 23 16:25 - down   (00:32)
danny    pts/1        python.crib      Tue Oct 23 16:09 - down   (00:47)
danny    pts/1        python.crib      Tue Oct 23 16:09 - 16:09  (00:00)
danny    pts/0        ftmtj1s.crib     Tue Oct 23 13:22 - down   (03:34)
danny    pts/0        ftmtj1s.crib     Mon Oct 22 01:18 - 01:43  (00:25)
danny    pts/0        ftmtj1s.crib     Sun Oct 21 01:34 - 21:06  (19:31)
danny    pts/0        ftmtj1s.crib     Sat Oct 20 13:58 - 14:01  (00:03)
danny    pts/0        ftmtj1s.crib     Fri Oct 19 16:52 - 00:23  (07:31)
danny    pts/0        python.crib      Fri Oct 19 11:49 - 14:15  (02:25)
danny    pts/0        python.crib      Thu Oct 18 15:27 - 15:37  (00:09)
danny    pts/0        python.crib      Thu Oct 18 15:22 - 15:23  (00:01)
danny    pts/1        192.168.0.65     Thu Oct 18 15:13 - 15:18  (00:05)
danny    pts/1        192.168.0.65     Thu Oct 18 14:38 - 15:13  (00:35)
Each time time the “reboot” command is executed the “reboot” user logs in. Running the “last reboot” command would then show the last reboot events. See out put below.
[root@nosebleed ~]# last reboot
reboot   system boot  2.6.18-8.1.14.el Wed Oct 24 15:51          (01:28)
reboot   system boot  2.6.18-8.1.14.el Tue Oct 23 16:59         (1+00:20)
reboot   system boot  2.6.18-8.1.10.el Thu Oct 18 14:30         (5+02:27)
reboot   system boot  2.6.18-8.1.10.el Wed Oct 17 02:05         (1+11:36)
reboot   system boot  2.6.18-8.1.10.el Tue Oct 16 23:00         (1+14:41)
reboot   system boot  2.6.18-8.1.10.el Tue Oct 16 21:05          (01:52)
reboot   system boot  2.6.18-8.1.10.el Fri Oct 12 22:27         (3+16:41)
If you only need halt and shutdown information. Running “last -x | grep down” will do that. See output below.
[root@nosebleed ~]# last -x | grep down
shutdown system down  2.6.18-8.1.10.el Tue Oct 23 16:58 - 17:22 (1+00:24)
danny    pts/2        python.crib      Tue Oct 23 16:25 - down   (00:32)
danny    pts/1        python.crib      Tue Oct 23 16:09 - down   (00:47)
danny    pts/0        ftmtj1s.crib     Tue Oct 23 13:22 - down   (03:34)
shutdown system down  2.6.18-8.1.10.el Thu Oct 18 13:42 - 16:57 (5+03:15)
danny    pts/3        ftmtj1s.crib     Thu Oct 18 13:28 - down   (00:12)
danny    pts/2        ftmtj1s.crib     Thu Oct 18 13:11 - down   (00:30)
danny    pts/1        192.168.0.65     Thu Oct 18 00:51 - down   (12:49)
danny    pts/0        192.168.0.65     Wed Oct 17 22:08 - down   (15:32)
shutdown system down  2.6.18-8.1.10.el Tue Oct 16 22:58 - 13:41 (1+14:42)
root     tty1                          Tue Oct 16 21:06 - down   (01:51)
shutdown system down  2.6.18-8.1.10.el Tue Oct 16 15:09 - 22:58  (07:48)
danny    pts/0        192.168.0.65     Tue Oct 16 15:04 - down   (00:04)
shutdown system down  2.6.18-8.1.10.el Fri Oct 12 22:25 - 15:08 (3+16:43)
Hope this helped, drop me a comment if you need info.
Alias command in Linux
The alias command is used to create shortcuts to commands. Let’s see how it works.
I use the alias command to create shortcuts for commands I use frequently. For example the cp(copy) and mv(move) commands, my alias simply adds -i to cp and mv commands causing them to be interactive thus preventing any accidental deletes or file overwrites.
Running the alias command will show you all the current aliases available.

alias mv=’mv -i’. This command will ad -i to the mv(move) command. Now, every time the mv command is executed it will be interactive. No more accidental overwrites
I use the alias command to create shortcuts for commands I use frequently. For example the cp(copy) and mv(move) commands, my alias simply adds -i to cp and mv commands causing them to be interactive thus preventing any accidental deletes or file overwrites.
Running the alias command will show you all the current aliases available.
[dummy@macho ~]$ aliasalias cp=’cp -i’. This command will ad -i to the cp(copy) command. Now, every time the cp command is executed it will be interactive. No more accidental deletes
alias l.=’ls -d .* –color=tty’
alias ll=’ls -l –color=tty’
alias ls=’ls –color=tty’
alias vi=’vim’
alias mv=’mv -i’. This command will ad -i to the mv(move) command. Now, every time the mv command is executed it will be interactive. No more accidental overwrites
[dummy@macho ~]$ alias cp=’cp -i’
[dummy@macho ~]$ alias mv=’mv-i’
[dummy@macho ~]$ alias
alias cp=’cp -i’
alias l.=’ls -d .* –color=tty’
alias ll=’ls -l –color=tty’
alias ls=’ls –color=tty’
alias mv=’mv-i’
alias vi=’vim’
Password protect single user mode
You forget your root password and get locked out of your own box.
What do you do? Typically, you would reboot into single user mode and
change the password there.
When booting into single user mode you will not be prompted for the root password. This is something every attacker knows and prays on once he has gained physical access to you box. So what do you do?
Firstly, a good sys admin knows not to forget the root password. Login in as root is never a good idea so using sudo is always advised. This still leaves the single user mode vulnerable, to secure it you will have to append the following line “su:S:wait:/sbin/sulogin” to your “/etc/inittab” file. Now, every time you boot into single user mode you will be prompted for the root password.
See sample below,
# password protect single user modePS: Always remember you password, if you can’t then write in down in a safe place.
su:S:wait:/sbin/sulogin
Server time slow
Another issue that popped up tonight. The time on a payroll server
seem to be slower then usual. Futher troubleshooting on the box revealed
that it took 4 seconds to move 1 second on the server. This caused the
payroll servers to stop communicating between each other as time sync
was part of a security measure built into the payroll software we run
here.
Some googling later it seem to be a BUG with the kernel. The fix, suggested to either update the kernel, recompile the kernel or add some kernel parameters in GRUB to fix the issue. I decided to go with the kernel parameters because this was a production server and the downtime window was very slim.
The fix,
Source: Linux Kernel Parameters
Some googling later it seem to be a BUG with the kernel. The fix, suggested to either update the kernel, recompile the kernel or add some kernel parameters in GRUB to fix the issue. I decided to go with the kernel parameters because this was a production server and the downtime window was very slim.
The fix,
- vi /etc/boot/grub.conf
- Add to the end of the kernel line. “clock=pit noapic nolapic”
- reboot and check time. “watch date”
# grub.conf generated by anaconda
#
# Note that you do not have to rerun grub after making changes to this file
# NOTICE:  You have a /boot partition.  This means that
#          all kernel and initrd paths are relative to /boot/, eg.
#          root (hd0,0)
#          kernel /vmlinuz-version ro root=/dev/md7
#          initrd /initrd-version.img
#boot=/dev/sda
default=0
timeout=10
splashimage=(hd0,0)/grub/splash.xpm.gz
title Red Hat Linux (2.4.9-e.3smp)
root (hd0,0)
kernel /vmlinuz-2.4.9-e.3smp ro root=/dev/md7 clock=pit noapic nolapic
initrd /initrd-2.4.9-e.3smp.img
title Red Hat Linux Advanced Server (2.4.9-e.3)
root (hd0,0)
kernel /vmlinuz-2.4.9-e.3 ro root=/dev/md7 clock=pit noapic nolapic
initrd /initrd-2.4.9-e.3.img
Source: Linux Kernel Parameters
Select all files but one on linux
My friend wanted to know how to select all files but one on the CLI
or in a bash script. This is how I normally do it, do you know a better
way?
From the command line

From the command line
ls * | grep -v [pattern to ignore]ls [!pattern to ignore] *
for i in `ls * | grep -v [pattern to ignore]`
do
   do something here
done
How to find files in linux
Need to find files older than certain time frame? This will help, “find [dir] -type f -mtime +[24hours*n] ”
Examples,
Show files older than 7 days
Examples,
Show files older than 7 days
find /tmp/ -type f -mtime +7find /tmp/ -type f -mtime +7 -exec rm {} ;find /tmp/ -type f -mtime +7 | xargs rmHow to remove ^M character with VI
This is how you remove those annoying ^M characters that show up in files previously edited on a Windows/DOS platform.
In VI,
In VI,
:%s/[ctrlkey+v and ctrl-key+M]//g:%s/^V^M//gHow to increase file descriptors max limit on Linux
Today my DBA reported that the server she was working on was spitting
out “too many open files” errors and no new processes could be started.
This is a common problem with DB servers with heavy transactions. In my environment there are 6 DB instances running on the server. No quite the optimized setup I would say.
The fix was to increase the total file descriptors kernel parameter count in the /etc/sysctl.conf file. I doubled my limit from 8192 to 16384.
The walk through,
1. Find out what the current open file descriptor limit is.
~# more /proc/sys/fs/file-max

~# 8192
~# sysctl -a | grep fs.file-max

~# fs.file-max = 8192~# more /proc/sys/fs/file-nr
~# 8191~# lsof | wc -l
~# 10325~# vi /etc/sysctl.conf
fs.file-max = 331287~# sysctl -p
~# fs.file-max = 331287How to set default session timeout in Linux
My DC operation guys access Linux servers on a daily basis but
somehow they never remember to log out. This is a security risk as
anyone could gain access to the open console and create caos.
Today, yet again I’m forced to play the bad guy by dummy proofing my Linux servers by implementing default timeout for user sessions.
Bash and Korn both support the TMOUT variable which I will use to set the default timeout.
The etc/.bashrc file will apply the timeout system wide but if you need it to be user specific then modify the ~/.bashrc file instead.
Here’s how it’s done.
echo "TMOUT=300 >> /etc/bashrcecho "readonly TMOUT" >> /etc/bashrcecho "export TMOUT" >> /etc/bashrcHow to keep your Linux session alive
Recently I wrote
about implementing session timeouts on Linux. For admin’s who know what
they are doing(most times) this can sometimes be an annoying
experience.
There’s a simple noop script over at bashcurescancer to help work around session timeouts. This will work for ssh and also the default virtual consoles.
Watch noop in action.
Source: BashCuresCancer
There’s a simple noop script over at bashcurescancer to help work around session timeouts. This will work for ssh and also the default virtual consoles.
Source: BashCuresCancer
How to change the system date in Linux
A friend needed help changing the system date on his Linux box today.
This is usually a simple task for Linux users but newbies tend to get
confused by the
To simplify, this is how you do it.
Set the current date to April 7 2008 8:42:45pm.
The easy way,
The harder way,
The break down: MM DD hh mm YYYY ss
MM = month = 04
DD = day = 07
hh = hour = 20
mm = minute = 42
YYYY = year = 2008
ss = second = 450
sample output,
"date [-u|--utc|--universal] [MMDDhhmm[[CC]YY][.ss]]" line in the man page.To simplify, this is how you do it.
Set the current date to April 7 2008 8:42:45pm.
The easy way,
#date -s "7 April 2008 20:42:45"The harder way,
#date 040720422008.45The break down: MM DD hh mm YYYY ss
MM = month = 04
DD = day = 07
hh = hour = 20
mm = minute = 42
YYYY = year = 2008
ss = second = 450
sample output,
[root@klmsyslog01p ~]# date -s "7 April 2008 20:42:45"

Mon Apr  7 20:42:45 MYT 2008

[root@klmsyslog01p ~]#
[root@kmmserver01p ~]# date 040720422008.45
Mon Apr 7 20:42:45 MYT 2008
[root@kmmserver01p ~]#
Google Earth for Linux
A spanking new release of Google Earth is out. The latest 4.3 release
comes with Photo Realistic 3D modeling for buildings, “Swoop
navigation” for an improved navigation experience, “Light and shadow” to
catch sunrise and sunset from anywhere and finally the popular “Street
View” which was previously a Google Maps only feature.
Now something to excite Linux users, Google Earth is now available for Linux. Not on WINE as but as a native application based on Qt and openGL. I’m yet to try it but for those who have I have heard nothing but good reviews with some minor glitches.
However Google Earth for Linux currently only supports the i386 architecture and seems to only work with 32bit processors.
The embedded video speaks for itself.
Download the latest Google Earth
How to limit ssh access to specific users or groups
Its sometimes necessary to limit who has access to a server via SSH.
Most Linux security hardening checklist today require this to be
enforced.
Fortunately this can be easily done with openSSH. Just edit the /etc/ssh/sshd_config file and add the desired directives shown below. You don’t need them all, just use what suits you needs.
openSSH provides 4 directives, AllowUsers, AllowGroups, DenyUsers and DenyGroups
Only users buddy, john and doe will be able to log in via ssh.
Only users within groups sysadmin and bkpadmin will be able to log in via ssh.
This is the opposite of AllowUsers. All users except for rambo and tina will be able to log in via ssh.
This is the opposite of AllowGroups. All groups except for hr and payroll will be able to log in via ssh.
Fortunately this can be easily done with openSSH. Just edit the /etc/ssh/sshd_config file and add the desired directives shown below. You don’t need them all, just use what suits you needs.
openSSH provides 4 directives, AllowUsers, AllowGroups, DenyUsers and DenyGroups
AllowUsers buddy john doeOnly users buddy, john and doe will be able to log in via ssh.
AllowGroups sysadmin bkpadminOnly users within groups sysadmin and bkpadmin will be able to log in via ssh.
DenyUsers rambo tinaThis is the opposite of AllowUsers. All users except for rambo and tina will be able to log in via ssh.
DenyGroups hr payrollThis is the opposite of AllowGroups. All groups except for hr and payroll will be able to log in via ssh.
How to send a process to the background
Sending a process to the background in Linux is quite easy. All you need is bg, fg, &, and ctrl+Z ( ^Z ).
For this example I will use a simple bash script test.sh I put together to print “Test” every 5 seconds.
Now let’s see how it’s done.
This starts test.sh and sends it to the background. You will be back at shell but should see the “Test” message every 5 seconds.
The jobs command will print all the background processes. Each process is represented by a number to it’s left. For example, tesh.sh is represented by 1.
The fg command will send the test.sh process to the foreground and return control to the shell.
The test.sh process is temporarily suspended.
The bg command will send test.sh to the background.
The jobs command will print all the background processes. Each process will be represented by a number to it’s left. tesh.sh is represented by 1.
The fg command will send the test.sh process to the foreground and return control to the shell.
That’s it.
For this example I will use a simple bash script test.sh I put together to print “Test” every 5 seconds.
#!/bin/bash

#This script will print "Test" every 5 seconds

#

while [ true ]

do

echo "Test at `date`"

sleep 5

done

#End
Now let’s see how it’s done.
[user@abubu root]$./test.sh &This starts test.sh and sends it to the background. You will be back at shell but should see the “Test” message every 5 seconds.
[user@abubu root]$jobs

[1]+  Running                 ./test.sh &
The jobs command will print all the background processes. Each process is represented by a number to it’s left. For example, tesh.sh is represented by 1.
[user@abubu root]$fg 1The fg command will send the test.sh process to the foreground and return control to the shell.
[user@abubu root]$ ./test.sh (hit ctrl+Z (^Z) now)

Test at Tue Jun  3 15:11:38 MYT 2008

[1]+  Stopped                 ./test.sh
The test.sh process is temporarily suspended.
[user@abubu root]$bg 1The bg command will send test.sh to the background.
[user@abubu root]jobs

[1]+  Running                 ./test.sh &
The jobs command will print all the background processes. Each process will be represented by a number to it’s left. tesh.sh is represented by 1.
[user@abubu root]$fg 1The fg command will send the test.sh process to the foreground and return control to the shell.
That’s it.
How to add route in Linux
To view the current routing table run “route -n”
To add a route refer to the command below.
To delete a route refer to the command below.
The routing information above is not persistent across reboots. After a reboot, the routing information will be lost and you need to add them in again.
To make the routing information persistent, add the “route add” line as seen above into the /etc/rc.local file.
Sample /etc/rc.local file.
[root@klmppswdr01p ~]# route -n

Kernel IP routing table

Destination     Gateway         Genmask         Flags Metric Ref    Use Iface

10.41.42.0      0.0.0.0         255.255.255.0   U     0      0        0 eth0

10.41.41.0      10.41.42.8      255.255.255.0   UG    0      0        0 eth0

169.254.0.0     0.0.0.0         255.255.0.0     U     0      0        0 eth0

0.0.0.0         10.41.42.1      0.0.0.0         UG    0      0        0 eth0
To add a route refer to the command below.
"route add -net 10.41.41.0 netmask 255.255.255.0 gw 10.41.42.8"To delete a route refer to the command below.
"route del -net 10.41.41.0 netmask 255.255.255.0 gw 10.41.42.8"The routing information above is not persistent across reboots. After a reboot, the routing information will be lost and you need to add them in again.
To make the routing information persistent, add the “route add” line as seen above into the /etc/rc.local file.
Sample /etc/rc.local file.
#!/bin/sh

#

# This script will be executed *after* all the other init scripts.

# You can put your own initialization stuff in here if you don't

# want to do the full Sys V style init stuff.

touch /var/lock/subsys/local

route add -net 10.41.41.0 netmask 255.255.255.0 gw 10.41.42.8
How To Execute Linux commands from Windows
Most of the time, users are having a Windows Machine on their desk or
laptop. Normally, we want to perform a full scale data retrieval from
our Linux servers in the DC, where we don’t have a trusted Linux server
to manage it….the answer to it is use “PLINK” utility.
Plink comes together with the Putty…
A simple example of usage is:
C:> plink USERNAME@SERVERNAME ‘YOUR-LINUX-COMMAND’
If you have a dozen of servers…then you probably want to write a batch script in Windows to loop through a list of servers and mention the list of commands juz like what i did…..
Here a typical windows batch script:
@echo off
for / f “tokens=*” %%A in (your-server-list.txt) ( C:pathtoplink.exe user@server -w YOUR-PASSWORD -m linuxcommandscript > YOUR_OUTPUT_FILE.txt)
There you go, i did this for my sar report data collection for root cause analysis and infrastructure load analysis….keying in a password wif every darn login is impractical and yet you dont want to generate a security key for the servers.
How to reset the root password for MySQL
It happens, you set a super complicated password for your MySQL root account and 2 months down the road forget what it was.
Here’s how you’d fix that.
1. Stop your current MySQL database if it is running
2. Start MySQL in safe mode and bypass reading the privilege table.
3. Reset your root password MySQL console. If it goes well you will not need to key in a password.
4. Kill the MySQL process and restart MySQL normally.
Here’s how you’d fix that.
1. Stop your current MySQL database if it is running
root@abubu# service mysqld stop2. Start MySQL in safe mode and bypass reading the privilege table.
root@abubu# mysqld_safe --skip-grant-tables3. Reset your root password MySQL console. If it goes well you will not need to key in a password.
root@abubu# mysql -u root mysqlmysql> update user set Password=PASSWORD('new-password');
mysql> flush privileges;
mysql exit;4. Kill the MySQL process and restart MySQL normally.
How to build a local DNS caching server
Being in Malaysia we are gifted with superior Internet speeds. NOT!!
Services like openDNS are awesome but the lag between us and them often results in sluggish performance anyways.
One way to improve performance is to use local DNS servers. I don’t use Streamyx’s DNS servers because they SUCK!!. TIME’s DNS servers are ok but I still prefer openDNS.
To improve performance, I put together a local DNS caching-only server that forwards to openDNS. Now I have openDNS with lighting fast response.
Let’s walk though the steps to get your own local DNS caching-only server setup. I’m using openSUSE 11 so the steps might vary depending on your distro.
1. Install BIND
2. Edit /etc/named.conf
Uncomment the forwarders section. Update the default values with the values below.
Add the line ” forward only; ” This will tell BIND to only forward to the forwarders and not the ROOT servers.
3. Start the service.
To have the service start automatically run ”
4. Let’s make sure your caching server is running fine.
5. Update your /etc/resolv.conf file.
This will tell your system to use the local DNS server which we just setup instead of the external ones.
Add the lines below to the file.
That’s it. You now have local DNS caching. Enjoy!!
My /etc/named.conf file. Only the lines I changed.
# Enable the next entry to prefer usage of the name server declared in
# the forwarders section.
#forward first;
forward only;
Services like openDNS are awesome but the lag between us and them often results in sluggish performance anyways.
One way to improve performance is to use local DNS servers. I don’t use Streamyx’s DNS servers because they SUCK!!. TIME’s DNS servers are ok but I still prefer openDNS.
To improve performance, I put together a local DNS caching-only server that forwards to openDNS. Now I have openDNS with lighting fast response.
Let’s walk though the steps to get your own local DNS caching-only server setup. I’m using openSUSE 11 so the steps might vary depending on your distro.
1. Install BIND
pandora:~ # zypper in bind2. Edit /etc/named.conf
pandora:~ # vi /etc/named..confUncomment the forwarders section. Update the default values with the values below.
forwarders { 208.67.222.222; 208.67.220.220; };
forward only;Add the line ” forward only; ” This will tell BIND to only forward to the forwarders and not the ROOT servers.
3. Start the service.
To have the service start automatically run ”
chkconfig named on ”pandora:~ # service named start4. Let’s make sure your caching server is running fine.
pandora:~ # nslookup google.com localhost

Server:         localhost

Address:        127.0.0.1#53
Non-authoritative answer:
Name:  google.com
Address: 64.233.167.99
Name:  google.com
Address: 72.14.207.99
Name:  google.com
Address: 64.233.187.99
pandora:~ # nslookup yahoo.com localhost

Server:         localhost

Address:        127.0.0.1#53
Non-authoritative answer:
Name:  yahoo.com
Address: 68.180.206.184
Name:  yahoo.com
Address: 206.190.60.375. Update your /etc/resolv.conf file.
This will tell your system to use the local DNS server which we just setup instead of the external ones.
Add the lines below to the file.
nameserver 127.0.0.1

nameserver 127.0.0.2
That’s it. You now have local DNS caching. Enjoy!!
My /etc/named.conf file. Only the lines I changed.
#forwarders { 192.0.2.1; 192.0.2.2; };

forwarders { 208.67.222.222; 208.67.220.220; };
# Enable the next entry to prefer usage of the name server declared in
# the forwarders section.
#forward first;
forward only;
VLC media player 0.9.2

VLC media player 0.9.2
Read the changelog while you download the installer.
How to find your Ubuntu version
2 easy ways find out what version of Ubuntu you’re running.
First option,
cat the /etc/issue file.
Second option
cat the /etc/lsb-release file.
or
run the lsb_release command with the “-a” switch.
First option,
cat the /etc/issue file.
danny@family-desktop:/etc$ cat /etc/issue

Ubuntu 8.04.1 n l
Second option
cat the /etc/lsb-release file.
danny@family-desktop:/etc$ cat /etc/lsb-release

DISTRIB_ID=Ubuntu

DISTRIB_RELEASE=8.04

DISTRIB_CODENAME=hardy

DISTRIB_DESCRIPTION="Ubuntu 8.04.1"
or
run the lsb_release command with the “-a” switch.
danny@family-desktop:/etc$ lsb_release -a

No LSB modules are available.

Distributor ID: Ubuntu

Description:    Ubuntu 8.04.1

Release:        8.04

Codename:       hardy
How to give someone root access in Linux
Giving someone root access in linux is easy. Why would someone need
to be root I don’t know but this is how you do it using the usermod
command.
To add root access
To remove root access.
To add root access
[root@abika root]# id sys_admin

uid=508(sys_admin) gid=508(sys_admin) groups=508(sys_admin)

[root@abika root]# usermod -G root sys_admin

[root@abika root]# id sys_admin

uid=508(sys_admin) gid=508(sys_admin) groups=508(sys_admin),0(root)
To remove root access.
[root@abika root]# usermod -G sys_admin sys_admin

[root@abika root]# id sys_admin

uid=508(sys_admin) gid=508(sys_admin) groups=508(sys_admin)
cannot allocate memory error
Had a weird memory error my Linux servers at work today. These were
heavy duty machines running heavy jobs throughout the day.
/var/log/messages kept reporting that the kernel had no more memory to
process new jobs. Most of the errors read ” cannot allocate memory ”
Some digging around later we found the fix. Kernel 2.6 has a new parameter “min_free_kbytes” which allows it to reserve a dedicated amount of memory for itself to process jobs. This kept the kernel from choking up when the servers were faced with sudden spikes in heavy jobs.
I set my server’s “min_free_kbytes” to “4096″ kbytes which was the recommended value. It’s more of a trial and error configuration so I’ll have to monitor the server over a period of time and increase the value if needed till I hit the sweet spot.
How to set it?
To have the new value take effect immediately, edit the “/proc/sys/vm/min_free_kbytes” file. Remember!, reboot and the changes will be forgotten.
To have it permanent, add “vm.min_free_kbytes=65536″ to the /etc/sysctl.conf file.
Some digging around later we found the fix. Kernel 2.6 has a new parameter “min_free_kbytes” which allows it to reserve a dedicated amount of memory for itself to process jobs. This kept the kernel from choking up when the servers were faced with sudden spikes in heavy jobs.
I set my server’s “min_free_kbytes” to “4096″ kbytes which was the recommended value. It’s more of a trial and error configuration so I’ll have to monitor the server over a period of time and increase the value if needed till I hit the sweet spot.
How to set it?
To have the new value take effect immediately, edit the “/proc/sys/vm/min_free_kbytes” file. Remember!, reboot and the changes will be forgotten.
echo "4096" > /proc/sys/vm/min_free_kbytesTo have it permanent, add “vm.min_free_kbytes=65536″ to the /etc/sysctl.conf file.
echo "vm.min_free_kbytes=4096" >> /etc/sysctl.conf
Get your PID with $$
“$$” is a useful Linux variable you could use in your script to get
it’s PID. The “$$” variable always holds the PID of the executing
process.
Why do you need it? Maybe to check if the script is already running? This is what I normally use it for.
Sample Script;
Sample Output;
Why do you need it? Maybe to check if the script is already running? This is what I normally use it for.
Sample Script;
#!/bin/bash

echo "My PID is $$"

sleep 2
Sample Output;
[root@keke ~]# ./test1.sh

My PID is 8909
System uptime with uptime
Want to know how long your Linux box has been up for?
Simple, just run the “uptime” command and you will be rewarded with the answer plus a bit more.
Above is the typical reply from uptime. On the left is the current time, followed by the system’s uptime, logged in users and finally the system’s load average.
Sample output;
Simple, just run the “uptime” command and you will be rewarded with the answer plus a bit more.
8:58pm up 19:54, 1 user, load average: 0.47, 0.62, 0.35Above is the typical reply from uptime. On the left is the current time, followed by the system’s uptime, logged in users and finally the system’s load average.
Sample output;
danesh@pandora:~> uptime

8:58pm  up  19:54,  1 user,  load average: 0.47, 0.62, 0.35
Simple sort with the sort command
You can easily sort your outputs in Linux using the “sort” command.
Simply pipe “|” your output to a “sort” command and you should see the
sorted results.
See sample usage below. This is just to start off, I’ve cover more in future posts.
Happy sorting!!
See sample usage below. This is just to start off, I’ve cover more in future posts.
[root@hantu ~]# cat numbers

5

4

3

2

1

0

6

7

8

9
[root@hantu ~]# cat numbers | sort
0
1
2
3
4
5
6
7
8
9[root@hantu ~]# cat numbers | sort -r
9
8
7
6
5
4
3
2
1
0Happy sorting!!
Reload you /etc/inittab file
You made changes to your /etc/inittab file but can’t effort any downtime.
There’s a simple trick to reload and apply changes in your /etc/inittab file without a reboot.
Run “init q” or “init Q”
There’s a simple trick to reload and apply changes in your /etc/inittab file without a reboot.
Run “init q” or “init Q”
[root@snoopy ~]# init q

[root@snoopy ~]#

[root@snoopy ~]# init Q

[root@snoopy ~]#
Download with cURL
Here’s how to download a file using cURL.
Sample Output;
curl -O [full url to file]curl -O http://downloads.wordpress.org/plugin/simple-tags.1.6.6.zipSample Output;
[root@kmon01 bin]# curl -O http://downloads.wordpress.org/plugin/simple-tags.1.6.6.zip

%     Total    % Received % Xferd  Average Speed   Time    Time     Time  Current

                                                      Dload     Upload  Total   Spent    Left   Speed

100  585k    0  585k        0         0 95317             0 --:--:
How to find the number of physical CPUs in Linux
With multicore CPUs it’s easy for newbies to get confused when faced with questions like;
1. How many physical CPUs does the server have?
2. How many cores on each CPU? Duo/Quad
In Linux it’s actually quite easy to get this info.
You could go through the /var/log/dmesg file or the /proc/cpuinfo file. For this tutorial we’ll look at the /proc/cpuinfo file.
Physical CPU count?
Run “cat /proc/cpuinfo | grep “physical id” | sort | uniq | wc -l”.
[root@bender ~]# cat /proc/cpuinfo | grep “physical id” | sort | uniq | wc -l
2
How many cores?
Run “cat /proc/cpuinfo | grep “cpu cores” | uniq”.
[root@kmigb000 ~]# cat /proc/cpuinfo | grep “cpu cores” | uniq
cpu cores      : 2
2 mean that each physical CPU has 2 cores on it. If cpu cores was 1 then the CPU’s single core.
How many virtual processors?
Run “cat /proc/cpuinfo | grep “^processor”"
[root@bender ~]# cat /proc/cpuinfo | grep “^processor”
processor      : 0
processor      : 1
processor      : 2
processor      : 3
That’s about right, 2 physical CPUs x 2 cores each = 4 virtual processeors.
However, it’s a bit different for HT (Hyper-Threading). If you get cpu core = 1 but the virtual processors = 2 then the CPU’s running HT. HT will only work with the SMP kernel.
Good collection of Linux Tutorials
EduChoices published an excellent list of Linux tutorials. The list includes tutorials for Linux newbies and experts alike.
Check it out, a must have if you into Linux The list below was taken from EduChoices.
Check it out, a must have if you into Linux The list below was taken from EduChoices.
Linux and UNIX Training for Beginners
Free Linux Tutorials for Beginners
- Introduction to Linux – This IBM tutorial is designed for people who want to learn what Linux is and how it can be used.
- Linux Desktop 101 – This 14-week course teaches students how to run the Linux operating system on a PC.
- Hands-On Introduction to Linux – Machtelt Garrels’ well-organized tutorial provides a hands-on introduction to Linux.
- Real Time Linux Introduction – A series of introductory Linux tutorials from the National Institute of Standards and Technology.
- Getting Started with Linux – This 20-lesson course from Linux Online is designed for people who are just getting started with Linux.
- Linux Fundamentals Course – The Shuttleworth Foundation’s fundamentals course takes approximately 18 hours to complete and gives students a basic understanding of the Linux operating system.
- The 35-Command Tutorial – This basic Linux tutorial from BeginLinux.org teaches 35 commands that every Linux user should know.
- Getting Started with Linux Desktop – Novell’s self-study course teaches basic Linux desktop skills.
Free UNIX Tutorials for Beginners
- UNIX Tutorial for Beginners – The University of Surrey’s beginner’s guide to the UNIX operating system features eight easy-to-follow tutorials.
- A Basic UNIX Tutorial – This Idaho State University tutorial teaches the fundamental of UNIX computing. The tutorial includes examples and exercises.
- UNIX Training Manual – This free 88-page training manual utilizes examples to teach UNIX filesystem commands. Not exactly a tutorial, but useful nevertheless.
- UNIX Command Tutorial – University of Mississippi course that teaches students how to interact with a UNIX operating system and perform various commands.
- Learn UNIX Tutorial – Soft Lookup’s comprehensive UNIX tutorial can take almost anyone from a beginner to an expert.
- UNIX – The Bare Minimum – This tutorial, from a UC Davis professor, offers a basic introduction to UNIX.
- Learning About UNIX – The University of Toronto offers open access to UNIX and Linux course notes. This course focuses on UNIX and Linux tools.
- What is UNIX? – This tutorial offers a simple introduction to UNIX and offers access to a forum for UNIX beginners.
Linux and UNIX Training for Experts
Free Linux Tutorials for Experts
- Linux Online’s Course for Advanced Users – This advanced course from Linux Online is fashioned into a series of how-to documents. Designed for people who want to learn more about installation, configuration and maintenance tasks.
- Linux System Administration Course – This 28-module course provides comprehensive training for system administrators.
- Kernel Tutorials – The kernel tutorials at HowToForge are a great way for Linux users to learn everything they need to know about kernels.
- Advanced Routing and Traffic Control Tutorial – This advanced Linux tutorial teaches users about routing, filtering and traffic shaping.
- Linux Enterprise Server Courses – Novell Training Services offers several different courses for advanced Linux users.
- Linux Network Administration Course – The Shuttleworth Foundation’s Linux Network Administration Course is split into separate tutorials that teach the fundamentals of network administration.
- Advanced Linux Programming – This tutorial is actually a book that can be downloaded for free. The book teaches users how to develop Linux software and write sophisticated programming.
- IBM’s Technical Library – IBM’s Technical Library offers a number of useful tutorials for advanced Linux users.
Free UNIX Tutorials for Experts
- UNIX for Advanced Users – Indiana University’s UNIX Workstation Support Group offers a great UNIX course for advanced users.
- Kevin Heard’s UNIX Tutorial – Kevin Heard (UC Berkeley) has a fantastic three-part tutorial that starts with an overview of UNIX and ends with advanced topics.
- Advanced UNIX Commands – Although this is more of a list than a tutorial, it makes a good reference for advanced UNIX users.
- Parallel Programming Tutorial – This UNIX tutorial teaches advanced users the ins and outs of parallel programming.
- Advanced Bash Scripting Guide – This UNIX tutorial from the Linux Document Project starts out with a programming overview and moves on to advanced scripting topics.
- UNIX Shell Scripting Advanced – VTC has a number of UNIX tutorials that are in video form. This one guides advanced users through their first shell script.
- Advanced C Shell Programming – This UC Davis tutorial teaches advanced C shell and tcsh programming techniques.
Sort files by size
Here’s how to sort files by size in Linux.
Standard;
Reverse;
Options used;
-l –> print long listing
-h –> print human readable sizes
-S –> sort by file size
-r –> reverse order
Output;
Standard;
ls -lhSReverse;
ls -lhSrOptions used;
-l –> print long listing
-h –> print human readable sizes
-S –> sort by file size
-r –> reverse order
Output;
[root@kmon01 log]# ls -lhS

total 70M

-rw-r--r--  1 root     root      36M Mar 31 11:28 messages

-rw-r--r--  1 root     root      15M Mar 31 11:25 cron

-rw-rw-r--  1 root     root      15M Mar 31 04:02 maillog

-rw-rw-r--  1 root     utmp     3.8M Mar 31 11:17 wtmp

-r--------  1 root     root     2.6M Mar 31 11:17 lastlog

-rw-r--r--  1 root     root     1.4M Mar 31 11:13 boot.log

-rw-r--r--  1 root     root      68K Mar 25 04:04 prelink.log

-rw-r--r--  1 root     root      67K May 25  2007 scrollkeeper.log

-rw-r--r--  1 root     root      54K Mar 31 04:02 rpmpkgs

-rw-r--r--  1 root     root      51K Dec 24  2007 xferlog

-rw-r--r--  1 root     root      38K May 25  2007 anaconda.syslog

-rw-r--r--  1 root     root      36K Jun 11  2007 Xorg.0.log

-rw-r--r--  1 root     root      15K Feb  2 10:34 dmesg

-rw-r--r--  1 root     root      13K May 25  2007 anaconda.log
[root@kmon01 log]# ls -lhrS
total 70M
-rw-r--r-- 1 root root 0 May 25 2007 spooler
-rw-r--r-- 1 root root 0 Mar 25 14:38 secure
-rwx------ 1 postgres postgres 0 May 25 2007 pgsql
-rw-r--r-- 1 root root 0 May 24 2007 mcelog
-rw-r--r-- 1 root root 23 Feb 2 10:35 snmpd.log
-rw-r--r-- 1 root root 715 Sep 1 2009 yum.log
-rw-r--r-- 1 mysql mysql 2.0K Dec 8 2008 mysqld.log
-rw-r--r-- 1 root root 2.1K Feb 2 10:35 acpid
-rw-r--r-- 1 root root 2.7K Mar 22 11:46 btmp
drwxr-xr-x 2 root root 4.0K Mar 31 11:21 httpd
drwxr-xr-x 2 root root 4.0K Mar 10 2006 gdm
drwxr-x--- 2 exim exim 4.0K Sep 9 2005 exim
-rw-r--r-- 1 root root 67K May 25 2007 scrollkeeper.log
-rw-r--r-- 1 root root 68K Mar 25 04:04 prelink.log
-rw-r--r-- 1 root root 1.4M Mar 31 11:13 boot.log
-r-------- 1 root root 2.6M Mar 31 11:17 lastlog
-rw-rw-r-- 1 root utmp 3.8M Mar 31 11:17 wtmp
-rw-rw-r-- 1 root root 15M Mar 31 04:02 maillog
-rw-r--r-- 1 root root 15M Mar 31 11:25 cron
-rw-r--r-- 1 root root 36M Mar 31 11:29 messages
How to Fix Ubuntu 10.10 VirtualBox Guest Additions Problems
If you’re trying to run Ubuntu 10.10 Beta on your VirtualBox, you’re
most likely having issues with the screen resolution. Installing the
default VirtualBox client doesn’t quite help. Try the steps below,
1. Open terminal and enter the following command:
2. Once installation is finished, restart your VirtualBox machine.
3. Go to System –>Preferences –>Monitors and change the resolution of your screen. You might be able to change the resolution but the screen will re-size properly when you maximize.
1. Open terminal and enter the following command:
#sudo apt-get update

#sudo apt-get install build-essential linux-headers-$(uname -r)

#sudo apt-get install virtualbox-ose-guest-x11
2. Once installation is finished, restart your VirtualBox machine.
3. Go to System –>Preferences –>Monitors and change the resolution of your screen. You might be able to change the resolution but the screen will re-size properly when you maximize.
How to reset your Gnome desktop
So you messed up the Gnome desktop and don’t know how to restore it back to it’s default settings. Here’s how with no risks.
1. Log out and then hit “Ctrl + ALT + F1″ to opening up a terminal.
2. Delete the following directories.
Or run the this command.
3. “Ctrl + ALT + F7/F8″ and log in as usual.
This guide is based on Ubuntu 10.10
1. Log out and then hit “Ctrl + ALT + F1″ to opening up a terminal.
2. Delete the following directories.
.gnome .gnome2 .gconf .gconfd .metacityOr run the this command.
rm -rf rm -rf .gnome .gnome2 .gconf .gconfd .metacity3. “Ctrl + ALT + F7/F8″ and log in as usual.
This guide is based on Ubuntu 10.10
Restart network service in Ubuntu
Here’s how to restart the network service on Ubuntu without restarting the OS
:~$ sudo /etc/init.d/networking restart
How to install Google Chrome on Fedora 16
Fedora 16 just came out and here’s how to get Google Chrome on it.
Start by creating a repository file for Google called google.repo and place it in /etc/yum.repos.d/ .
Add the lines below into the repository file. google.repo
Update yum,
Search for Google Chrome,
Install Google Chrome Stable
If you prefer the beta like me then run,
Start by creating a repository file for Google called google.repo and place it in /etc/yum.repos.d/ .
sudo vim /etc/yum.repos.d/google.repo
Add the lines below into the repository file. google.repo
[google-chrome]

name=google-chrome - 64-bit

baseurl=http://dl.google.com/linux/chrome/rpm/stable/x86_64

enabled=1

gpgcheck=1

gpgkey=https://dl-ssl.google.com/linux/linux_signing_key.pub
Update yum,
sudo yum updateSearch for Google Chrome,
sudo yum search google-chromeInstall Google Chrome Stable
sudo yum install google-chrome-stableIf you prefer the beta like me then run,
sudo yum install google-chrome-beta
How to get Hard Disk Details on Linux
Here’s a quick way to find out more about your hard disk. You can get
the serial number, part number, firmware level, size and much more.
Just see the sample below.
hdparm -I [device]
hdparm -I [device]
hdparm -I /dev/sda[danesh@pandora Movies]$ sudo hdparm -I /dev/sda/dev/sda:
ATA device, with non-removable media
Model Number: WDC WD2500JS-75NCB3
Serial Number: WD-WCANKF265386
Firmware Revision: 10.02E04
Standards:
Supported: 7 6 5 4
Likely used: 8
Configuration:
Logical max current
cylinders 16383 16383
heads 16 16
sectors/track 63 63
--
CHS current addressable sectors: 16514064
LBA user addressable sectors: 268435455
LBA48 user addressable sectors: 488281250
Logical/Physical Sector size: 512 bytes
device size with M = 1024*1024: 238418 MBytes
device size with M = 1000*1000: 250000 MBytes (250 GB)
cache/buffer size = 8192 KBytes
Capabilities:
LBA, IORDY(can be disabled)
Queue depth: 32
Standby timer values: spec'd by Standard, with device specific minimum
R/W multiple sector transfer: Max = 16 Current = 16
Recommended acoustic management value: 128, current value: 128
DMA: mdma0 mdma1 mdma2 udma0 udma1 udma2 udma3 udma4 udma5 *udma6
Cycle time: min=120ns recommended=120ns
PIO: pio0 pio1 pio2 pio3 pio4
Cycle time: no flow control=120ns IORDY flow control=120ns
Commands/features:
Enabled Supported:
* SMART feature set
Security Mode feature set
* Power Management feature set
* Write cache
* Look-ahead
* Host Protected Area feature set
* WRITE_BUFFER command
* READ_BUFFER command
* NOP cmd
* DOWNLOAD_MICROCODE
Power-Up In Standby feature set
* SET_FEATURES required to spinup after power up
SET_MAX security extension
* Automatic Acoustic Management feature set
* 48-bit Address feature set
* Device Configuration Overlay feature set
* Mandatory FLUSH_CACHE
* FLUSH_CACHE_EXT
* SMART error logging
* SMART self-test
* General Purpose Logging feature set
* Gen1 signaling speed (1.5Gb/s)
* Gen2 signaling speed (3.0Gb/s)
* Native Command Queueing (NCQ)
* Host-initiated interface power management
* Phy event counters
DMA Setup Auto-Activate optimization
Device-initiated interface power management
* Software settings preservation
* SMART Command Transport (SCT) feature set
* SCT Long Sector Access (AC1)
* SCT LBA Segment Access (AC2)
* SCT Error Recovery Control (AC3)
* SCT Features Control (AC4)
* SCT Data Tables (AC5)
unknown 206[12] (vendor specific)
Security:
Master password revision code = 65534
supported
not enabled
not locked
frozen
not expired: security count
not supported: enhanced erase
Checksum: correct
How can non root users mount and unmount in Linux
File systems / partitions are normally managed by root and only root would be able to mount or un-mount.
However, if you want everyone on your machine to have the same privilege for a specific mount point, this is how you can do that.
Add “user” to the mount options for the desired mount point in your /etc/fstab file. In my case “/media/music”
I changed mine from
to
However, if you want everyone on your machine to have the same privilege for a specific mount point, this is how you can do that.
Add “user” to the mount options for the desired mount point in your /etc/fstab file. In my case “/media/music”
I changed mine from
//192.168.1.200/Music /media/music rw,noauto 0 0
to
//192.168.1.200/Music /media/music cifs user,rw,noauto 0 0
How to configure a static ip in Linux
This is a newbie question I get quite often.
Configuring your Linux machine to run on a static IP is easy. Tools like system-config-network and netconfig provide you simple GUIs to do this.
For today, I’ll show you how to do this from the command line instead.
Navigate to /etc/sysconfig/network-scripts/
Every network interface will have it’s own interface script file. eth0,eth1,eth2 and so on. Vi the ifcfg-eth0 interface script file for interface eth0. Replace the contents of the ifcfg-eth0 file with the parameters below.
If you want to switch back to DHCP, repeat the steps above and replace the contents of the ifcfg-eth0 file with the parameters below.
Restart your interface to apply the changes.
To update your dns server settings, modify the /etc/resolv.conf.
Replace the contents of the resolv.conf file with the parameters below. The first parameter “search” is your search path followed the nameserver parameters which hold the IPs for your primary and secondary DNS servers.
Configuring your Linux machine to run on a static IP is easy. Tools like system-config-network and netconfig provide you simple GUIs to do this.
For today, I’ll show you how to do this from the command line instead.
Navigate to /etc/sysconfig/network-scripts/
[root@baboo]# cd /etc/sysconfig/network-scripts/Every network interface will have it’s own interface script file. eth0,eth1,eth2 and so on. Vi the ifcfg-eth0 interface script file for interface eth0. Replace the contents of the ifcfg-eth0 file with the parameters below.
[root@baboo]# vi ifcfg-eth0.
DEVICE=eth0

TYPE=Ethernet

ONBOOT=yes

BOOTPROTO=none

IPADDR=192.168.0.100

NETMASK=255.255.255.0

GATEWAY=192.168.0.1

HWADDR=00:0F:22:71:0A:53

USERCTL=no

USERCTL=no
If you want to switch back to DHCP, repeat the steps above and replace the contents of the ifcfg-eth0 file with the parameters below.
DEVICE=eth0

BOOTPROTO=dhcp

HWADDR=00:0F:20:71:0A:50

ONBOOT=yes

TYPE=Ethernet

DHCP_HOSTNAME=klmdrpdr01p.klm1.netcel360.com
Restart your interface to apply the changes.
[root@baboo]#ifdown eth0

[root@baboo]#ifup eth0
To update your dns server settings, modify the /etc/resolv.conf.
[root@baboo]# vi /etc/resolv.confReplace the contents of the resolv.conf file with the parameters below. The first parameter “search” is your search path followed the nameserver parameters which hold the IPs for your primary and secondary DNS servers.
search example.com

nameserver 192.168.0.5

nameserver 192.168.0.6Monday, November 26, 2012
Iframe with 100% Height
Ever wonder how to create an iframe that fills the entire height (and width) of a page?
You probably tried writing something like:
and expected the iframe to fill up whatever it could.
The
Here's some easy JavaScript to do exactly this:
Put this in the head of your page:
You probably tried writing something like:
<iframe width=100% height=100%></iframe>
and expected the iframe to fill up whatever it could.
The
width=100% does what you expected and fills up the entire width of the page, but the height just stays about 200px.Here's some easy JavaScript to do exactly this:
Put this in the head of your page:
<script language="JavaScript">
<!--
function resize_iframe()
{

 var height=window.innerWidth;//Firefox
 if (document.body.clientHeight)
 {
  height=document.body.clientHeight;//IE
 }
 //resize the iframe according to the size of the
 //window (all these should be on the same line)
 document.getElementById("glu").style.height=parseInt(height-
 document.getElementById("glu").offsetTop-8)+"px";
}

// this will resize the iframe every
// time you change the size of the window.
window.onresize=resize_iframe;

//Instead of using this you can use:
// <BODY onresize="resize_iframe()">


//-->
</script>
<iframe id="glu" width="100%" onload="resize_iframe()">
</iframe>
Sunday, November 25, 2012
How to Mount a Remote Folder using SSH on Ubuntu
Connecting to a server across the internet is much more secure using
SSH. There is a way that you can mount a folder on a remove server using
the SSHFS service.
There are quite a few steps that you’ll have to follow, so get ready and open a terminal window.
First we’ll install the module:
Now we’ll create a directory to mount the remote folder in. I chose to create it in my home directory and call it remoteserv.
There are quite a few steps that you’ll have to follow, so get ready and open a terminal window.
First we’ll install the module:
sudo apt-get install sshfsNow we will use the modprobe command to load it
sudo modprobe fuseWe’ll need to set up some permissions in order to access the utilities. Replace <username> with your username.
sudo adduser <username> fuseSince we’ve added ourselves to a user group, we need to logout and back in at this point before we continue.
sudo chown root:fuse /dev/fuse
sudo chmod +x /dev/fusermount
Now we’ll create a directory to mount the remote folder in. I chose to create it in my home directory and call it remoteserv.
mkdir ~/remoteservNow we have the command to actually mount it. You’ll be prompted to save the server key and for your remote password.
sshfs <username>@<ipaddress>:/remotepath ~/remoteservNow you should be able to cd into the directory and start using it as if it was local.
geek@ubuntuServ:~/remoteserv$ ls -l
total 16
drwxr-xr-x 1 951247 155725 4096 2006-12-13 13:30 howtogeek.com
drwxr-sr-x 1 root root 4096 2006-09-11 06:45 logs
drwx—— 1 951247 155725 4096 2006-08-11 16:09 Maildir
drwxrwxr-x 1 951247 155725 4096 2006-10-29 02:34 scripts
Install Samba Server on Ubuntu
If you want to share files between your Ubuntu and Windows computers, your best option is to use Samba file sharing.
To install, first open a terminal window and enter the following command:
Create a Samba User
There are two steps to creating a user. First we’ll run the smbpasswd utility to create a samba password for the user.
To install, first open a terminal window and enter the following command:
sudo apt-get install samba smbfsWe’ve got samba installed, but now we’ll need to configure it to make it accessible. Run the following command to open the configuration file, substituting your editor of choice:
sudo gedit /etc/samba/smb.confFind this section in the file:
####### Authentication #######Uncomment the security line, and add another line to make it look like this:
# “security = user” is always a good idea. This will require a Unix account
# in this server for every user accessing the server. See
# /usr/share/doc/samba-doc/htmldocs/Samba-HOWTO-Collection/ServerType.html
# in the samba-doc package for details.
; security = user
security = userThis will set Samba to use the smbusers file for looking up the user list.
username map = /etc/samba/smbusers
Create a Samba User
There are two steps to creating a user. First we’ll run the smbpasswd utility to create a samba password for the user.
sudo smbpasswd -a <username>Next, we’ll add that username to the smbusers file.
sudo gedit /etc/samba/smbusersAdd in the following line, substituting the username with the one you want to give access to. The format is <ubuntuusername> = “<samba username>”. You can use a different samba user name to map to an ubuntu account, but that’s not really necessary right now.
<username> = “<username>”Now you can create samba shares and give access to the users that you listed here.
Create a Samba User on Ubuntu
If you are using Samba Server on your network, you will want to
create users that have access to use it. There’s a very simple command
structure on how to do so.
I’m assuming that you’ve already installed Samba Server at this point.
There are two steps to creating a user. First we’ll run the smbpasswd utility to create a samba password for the user.
I’m assuming that you’ve already installed Samba Server at this point.
There are two steps to creating a user. First we’ll run the smbpasswd utility to create a samba password for the user.
sudo smbpasswd -a <username>Next, we’ll add that username to the smbusers file.
sudo gedit /etc/samba/smbusersAdd in the following line, substituting the username with the one you want to give access to. The format is <ubuntuusername> = “<samba username>”. You can use a different samba user name to map to an ubuntu account, but that’s not really necessary right now.
<username> = “<username>”Now you can create samba shares and give access to the users that you listed here.
Change your Network Card MAC Address on Ubuntu
There are a lot of reasons you might want to manually set your MAC
address for your network card. I won’t ask you what your reason is.
To change this setting, we’ll need to edit the /etc/network/interfaces file. You can choose to use a different editor if you’d like.
To change this setting, we’ll need to edit the /etc/network/interfaces file. You can choose to use a different editor if you’d like.
sudo gedit /etc/network/interfacesYou should see the line for your network interface, which is usually eth0. If you have dhcp enabled, it will look like this:
auto eth0Just add another line below it to make it look something like this:
iface eth0 inet dhcp
auto eth0Obviously you would want to choose something else for the MAC address, but it needs to be in the same format.
iface eth0 inet dhcp
hwaddress ether 01:02:03:04:05:06
sudo /etc/init.d/networking restartYou will need to restart networking or reboot to take effect.
Change the GRUB Menu Timeout on Ubuntu
When your Ubuntu system boots, you will see the GRUB menu if you hit the Esc key, or if you’ve enabled the menu to show by default.
The only issue with this is that the default timeout is only 3 seconds.
You may want to increase this amount… or you may even want to decrease
it. Either one is simple.
Open up the /boot/grub/menu.lst file in your favorite text editor. I’m using gedit:
Open up the /boot/grub/menu.lst file in your favorite text editor. I’m using gedit:
sudo gedit /boot/grub/menu.lstNow find the section that looks like this:
## timeout secThe timeout value is in seconds. Save the file, and when you reboot you will have that many seconds to choose the menu item you want.
# Set a timeout, in SEC seconds, before automatically booting the default entry
# (normally the first entry defined).
timeout 3
Change the DHCP IP Address Range for VMware NAT
VMware Workstation includes a network utility that allows you to
manage the virtual networks. Typically virtual machines will use NAT
(Network Address Translation) to automatically assign a virtual IP
address that hides behind your host address, but the default range of
192.168.200.0/24 may not work for everybody.
You can change this address range to anything you like easily. Note that you should not have virtual machines running during this.
First open the Manage Virtual Networks start menu item:

Click the Host Virtual Network Mapping tab, and then click the arrow button next to the VMnet8 dropdown box. VMnet8 is the default NAT adapter for VMware.

Choose the Subnet option, and you will see a dialog where you can change the network range:

Once you have changed the network here, you can click the OK or Apply buttons, and after a few seconds it will update.
You can change this address range to anything you like easily. Note that you should not have virtual machines running during this.
First open the Manage Virtual Networks start menu item:
Click the Host Virtual Network Mapping tab, and then click the arrow button next to the VMnet8 dropdown box. VMnet8 is the default NAT adapter for VMware.
Choose the Subnet option, and you will see a dialog where you can change the network range:
Once you have changed the network here, you can click the OK or Apply buttons, and after a few seconds it will update.
Change SSH Welcome Banner on Ubuntu
Every time I connect to my Ubuntu development server through my ssh
client, I receive the same message and I’m getting tired of seeing it,
so I decided to change the message to something else.
Here’s the message that I get every time:
To disable the last login message (which I don’t recommend doing), you will need to edit the following file in sudo mode:
Here’s the message that I get every time:
Linux superfast 2.6.20-16-generic #2 SMP Thu Jun 7 19:00:28 UTC 2007 x86_64Changing this message requires editing two different files. The first three sections can be modified by editing the following file:
The programs included with the Ubuntu system are free software;
the exact distribution terms for each program are described in the
individual files in /usr/share/doc/*/copyright.
Ubuntu comes with ABSOLUTELY NO WARRANTY, to the extent permitted by
applicable law.
Last login: Mon Aug 13 01:05:46 2007 from ipaddress removed
geek@superfast:~$
/etc/motdThis file contains the linux build number as well as the Ubuntu warranty message. I don’t find this particularly useful, so I removed all of it and replaced it with my own message.
To disable the last login message (which I don’t recommend doing), you will need to edit the following file in sudo mode:
/etc/ssh/sshd_configFind this line in the file and change the yes to no as shown:
PrintLastLog noNow when you login, you’ll get a blank prompt, although I wouldn’t necessarily recommend it because it’s useful to see the last login to the system for security reasons. This is my prompt now:
This is a superfast system. Please max out the cpu accordingly.Linux is really great.
Last login: Mon Aug 13 01:24:14 2007 from ipaddress removed
geek@superfast:~$
Change or set the MySQL root password
For every database, you should set the root or sa passwords to
something other than the default, unless you want to get hacked. For
mysql, the system administrator user is called root. You will use the
mysqladmin utility from a command line to set the new password. Notice
that there are two commands to be run.
Syntax:
Syntax:
mysqladmin -u root password “newpassword”Example:
mysqladmin -u root -h host_name password “newpassword”
mysqladmin -u root password ws8dr8as3You will also want to restart the database server after running this command
mysqladmin -u root -h localhost password ws8dr8as3
sudo /etc/init.d/mysql restart
Boot from a USB drive even if your BIOS Won’t Let You
You’ve always got a trusty bootable USB flash drive with you to solve
computer problems, but what if a PC’s BIOS won’t let you boot from USB?
We’ll show you how to make a CD or floppy disk that will let you boot
from your USB drive.

This boot menu, like many created before USB drives became cheap and commonplace, does not include an option to boot from a USB drive.
A piece of freeware called PLoP Boot Manager solves this problem, offering an image that can burned to a CD or put on a floppy disk, and enables you to boot to a variety of devices, including USB drives.
Put PLoP on a CD
PLoP comes as a zip file, which includes a variety of files. To put PLoP on a CD, you will need either plpbt.iso or plpbtnoemul.iso from that zip file. Either disc image should work on most computers, though if in doubt plpbtnoemul.iso should work “everywhere,” according to the readme included with PLoP Boot Manager.
Burn plpbtnoemul.iso or plpbt.iso to a CD and then skip to the “booting PLoP Boot Manager” section.
Put PLoP on a Floppy Disk
If your computer is old enough to still have a floppy drive, then you will need to put the contents of the plpbt.img image file found in PLoP’s zip file on a floppy disk.
To do this, we’ll use a freeware utility called RawWrite for Windows.

We aren’t fortunate enough to have a floppy drive installed, but if you do it should be listed in the Floppy drive drop-down box. Select your floppy drive, then click on the “…” button and browse to plpbt.img. Press the Write button to write PLoP boot manager to your floppy disk.

Booting PLoP Boot Manager
To boot PLoP, you will need to have your CD or floppy drive boot with higher precedence than your hard drive. In many cases, especially with floppy disks, this is done by default.
If the CD or floppy drive is not set to boot first, then you will need to access your BIOS’s boot menu, or the setup menu. The exact steps to do this vary depending on your BIOS – to get a detailed description of the process, search for your motherboard’s manual (or your laptop’s manual if you’re working with a laptop).
In general, however, as the computer boots up, some important keyboard strokes are noted somewhere prominent on the screen. In our case, they are at the bottom of the screen.

Press Escape to bring up the Boot Menu. Previously, we burned a CD with PLoP Boot Manager on it, so we will select the CD-ROM Drive option and hit Enter.

If your BIOS does not have a Boot Menu, then you will need to access the Setup menu and change the boot order to give the floppy disk or CD-ROM Drive higher precedence than the hard drive. Usually this setting is found in the “Boot” or “Advanced” section of the Setup menu.

If done correctly, PLoP Boot Manager will load up, giving a number of boot options.

Highlight USB and press Enter.

PLoP begins loading from the USB drive.

Despite our BIOS not having the option, we’re now booting using the USB drive, which in our case holds an Ubuntu Live CD!

This is a pretty geeky way to get your PC to boot from a USB…provided your computer still has a floppy drive. Of course if your BIOS won’t boot from a USB it probably has one…or you really need to update it.
This boot menu, like many created before USB drives became cheap and commonplace, does not include an option to boot from a USB drive.
A piece of freeware called PLoP Boot Manager solves this problem, offering an image that can burned to a CD or put on a floppy disk, and enables you to boot to a variety of devices, including USB drives.
Put PLoP on a CD
PLoP comes as a zip file, which includes a variety of files. To put PLoP on a CD, you will need either plpbt.iso or plpbtnoemul.iso from that zip file. Either disc image should work on most computers, though if in doubt plpbtnoemul.iso should work “everywhere,” according to the readme included with PLoP Boot Manager.
Burn plpbtnoemul.iso or plpbt.iso to a CD and then skip to the “booting PLoP Boot Manager” section.
Put PLoP on a Floppy Disk
If your computer is old enough to still have a floppy drive, then you will need to put the contents of the plpbt.img image file found in PLoP’s zip file on a floppy disk.
To do this, we’ll use a freeware utility called RawWrite for Windows.
We aren’t fortunate enough to have a floppy drive installed, but if you do it should be listed in the Floppy drive drop-down box. Select your floppy drive, then click on the “…” button and browse to plpbt.img. Press the Write button to write PLoP boot manager to your floppy disk.
Booting PLoP Boot Manager
To boot PLoP, you will need to have your CD or floppy drive boot with higher precedence than your hard drive. In many cases, especially with floppy disks, this is done by default.
If the CD or floppy drive is not set to boot first, then you will need to access your BIOS’s boot menu, or the setup menu. The exact steps to do this vary depending on your BIOS – to get a detailed description of the process, search for your motherboard’s manual (or your laptop’s manual if you’re working with a laptop).
In general, however, as the computer boots up, some important keyboard strokes are noted somewhere prominent on the screen. In our case, they are at the bottom of the screen.
Press Escape to bring up the Boot Menu. Previously, we burned a CD with PLoP Boot Manager on it, so we will select the CD-ROM Drive option and hit Enter.
If your BIOS does not have a Boot Menu, then you will need to access the Setup menu and change the boot order to give the floppy disk or CD-ROM Drive higher precedence than the hard drive. Usually this setting is found in the “Boot” or “Advanced” section of the Setup menu.
If done correctly, PLoP Boot Manager will load up, giving a number of boot options.
Highlight USB and press Enter.
PLoP begins loading from the USB drive.
Despite our BIOS not having the option, we’re now booting using the USB drive, which in our case holds an Ubuntu Live CD!
This is a pretty geeky way to get your PC to boot from a USB…provided your computer still has a floppy drive. Of course if your BIOS won’t boot from a USB it probably has one…or you really need to update it.
Backup MySQL Database to a file
Backing up your database is a very important system administration
task, and should generally be run from a cron job at scheduled
intervals. We will use the mysqldump utility included with mysql to dump
the contents of the database to a text file that can be easily
re-imported.
Syntax:
Syntax:
mysqldump -h localhost -u root -pmypassword databasename > dumpfile.sqlExample:
mysqldump -h localhost -u root -p2Uad7as9 database01 > dumpfile.sqlThis will give you a text file containing all the commands required to recreate the database.
Allow Remote Control To Your Desktop On Ubuntu
Enabling remote desktop mode is extremely easy on Ubuntu since
Dapper. You can allow other users to access your desktop using the VNC
Viewer utility that is bundled with Ubuntu, or offered as a free
download for Windows.
Note that enabling remote control of your desktop is never a safe thing to do unless you have a firewall installed and configured correctly, and even then is still a potential security problem. Now that you’ve been warned of the risks, let’s move on.
Navigate to the System \ Preferences \ Remote Desktop on the Gnome top menu.
You’ll see this window:

The first two checkboxes need to be checked in order for remote desktop to be enabled.
The Security section is important: If you select the “Ask you for confirmation” code, then you will need to be at the computer in order to allow the other person to access your desktop. If you are trying to remotely access one of your own computers, you will want to uncheck this box.
The second checkbox should always be checked, and you should enter a secure password. You will be prompted for this password when you try to log on.
Note that enabling remote control of your desktop is never a safe thing to do unless you have a firewall installed and configured correctly, and even then is still a potential security problem. Now that you’ve been warned of the risks, let’s move on.
Navigate to the System \ Preferences \ Remote Desktop on the Gnome top menu.
You’ll see this window:
The first two checkboxes need to be checked in order for remote desktop to be enabled.
The Security section is important: If you select the “Ask you for confirmation” code, then you will need to be at the computer in order to allow the other person to access your desktop. If you are trying to remotely access one of your own computers, you will want to uncheck this box.
The second checkbox should always be checked, and you should enter a secure password. You will be prompted for this password when you try to log on.
Installing PHP5 and Apache on Ubuntu
If you are doing any kind of PHP development, you’ll almost always be
using Apache along with it. Here’s the quick and easy way to get PHP up
and running on your Ubuntu box.
First, you’ll want to add the extra repositories to Ubuntu’s sources.list file.
From a command shell, you will run the following commands:
First, you’ll want to add the extra repositories to Ubuntu’s sources.list file.
From a command shell, you will run the following commands:
sudo apt-get install apache2Note that if apache is already installed you can omit the first line. Your web files will now be found in /var/www/
sudo apt-get install php5
sudo apt-get install libapache2-mod-php5
sudo /etc/init.d/apache2 restart
How to install Apache on Linux
The installation, care, and feeding of an Apache Web server is not
terribly difficult, but can seem so if you haven't ventured into those
particular waters before. This quick-start guide will help you get your
feet wet with Apache on a Linux server. You'll find it's relatively
simple to get the Web server set up and running on your Linux of choice.
We'll also install PHP and MySQL, though we won't be digging into MySQL configurations, as that deserves a quick start all its own.
The method of installing the Apache packages on a Linux server varies from distribution to distribution. We'll cover how to do this on Fedora and CentOS, as well as on Ubuntu. This is a server-centric walkthrough, so we'll use the command line exclusively. Naturally, you'll need root-level privileges. Open the terminal window and type:
[ Prove your expertise with the free OS in InfoWorld's Linux admin IQ test round 1 and round 2. | Track the latest trends in open source with InfoWorld's Open Sources blog and Technology: Open Source newsletter. ]
Then enter the root password. Now we can get started.
First we'll install the packages themselves. For Fedora and CentOS, this is a simple step involving Yum, the package installer and updater. To install the basic Apache and PHP packages, run the following command:
Follow the prompts, as this tool will locate and install a base set of Apache and PHP packages.
For Ubuntu 10.04 servers and newer, you can install the whole LAMP (Apache, MySQL, and PHP) stack with two commands:
While
this guide does not cover MySQL, the above commands are a quick way to
get all the necessary packages required for LAMP applications. Once the
installation is complete, we can begin configuring the server.
For all file editing, on Fedora, CentOS, or Ubuntu, you may want to use nano:
This
command will open the Apache configuration file in a basic editor. You
can save the file with Ctrl-O and exit the editor with Ctrl-X.
Apache on Linux: Initial configuration
While the Apache and PHP packages are essentially the same across the different distributions, there are differences in how they are actually installed on the file system. We'll start with Fedora and CentOS.
Fedora and CentOS. After installation, you'll find a new directory: /etc/httpd. Within this directory are all the Apache configuration files. The important subdirectories for our purposes are /etc/httpd/conf and /etc/httpd/conf.d. Within /etc/httpd you'll find the main Apache configuration file, httpd.conf. In /etc/httpd/conf.d you will find includes, or supplemental files that are included in the main configuration file.
Includes are a way to break out complex configurations into separate files for easy organization and management. For instance, if you have an Apache server that has 20 virtual hosts, then each virtual host should have a separate file in /etc/httpd/conf.d/ that contains its specific configuration parameters. In this way, you can easily add or remove virtual hosts without editing the main Apache configuration file.
In order for files to be included in the Apache configuration, they must have a filename that ends with .conf. If we have a virtual host named www.test.com, all the configuration elements for that virtual host would reside in a file named test.conf or test.com.conf.
You can see how these files are included in the main configuration file by looking at /etc/httpd/conf/httpd.conf. Press Ctrl-W to search for "Include conf.d" and you'll find this line:
The method of installing the Apache packages on a Linux server varies from distribution to distribution. We'll cover how to do this on Fedora and CentOS, as well as on Ubuntu. This is a server-centric walkthrough, so we'll use the command line exclusively. Naturally, you'll need root-level privileges. Open the terminal window and type:
su -Then enter the root password. Now we can get started.
First we'll install the packages themselves. For Fedora and CentOS, this is a simple step involving Yum, the package installer and updater. To install the basic Apache and PHP packages, run the following command:
yum install httpd php mysql mysql-serverFor Ubuntu 10.04 servers and newer, you can install the whole LAMP (Apache, MySQL, and PHP) stack with two commands:
sudo apt-get install tasksel
sudo tasksel install lamp-serverFor all file editing, on Fedora, CentOS, or Ubuntu, you may want to use nano:
nano /etc/httpd/conf/httpd.confApache on Linux: Initial configuration
While the Apache and PHP packages are essentially the same across the different distributions, there are differences in how they are actually installed on the file system. We'll start with Fedora and CentOS.
Fedora and CentOS. After installation, you'll find a new directory: /etc/httpd. Within this directory are all the Apache configuration files. The important subdirectories for our purposes are /etc/httpd/conf and /etc/httpd/conf.d. Within /etc/httpd you'll find the main Apache configuration file, httpd.conf. In /etc/httpd/conf.d you will find includes, or supplemental files that are included in the main configuration file.
Includes are a way to break out complex configurations into separate files for easy organization and management. For instance, if you have an Apache server that has 20 virtual hosts, then each virtual host should have a separate file in /etc/httpd/conf.d/ that contains its specific configuration parameters. In this way, you can easily add or remove virtual hosts without editing the main Apache configuration file.
In order for files to be included in the Apache configuration, they must have a filename that ends with .conf. If we have a virtual host named www.test.com, all the configuration elements for that virtual host would reside in a file named test.conf or test.com.conf.
You can see how these files are included in the main configuration file by looking at /etc/httpd/conf/httpd.conf. Press Ctrl-W to search for "Include conf.d" and you'll find this line:
Include conf.d/*.confCreate tab on Facebook page (updated)
CUSTOM FACEBOOK TAB
As usual Facebook keep changing, improving and driving nuts many developers and users.
How to have however a new tab into your page on Facebook and in personal profile
1. Go to your https://developers.facebook.com/apps (if you have not account there just create one, it is fast and free – follow the instructions)
2. Create an app , take care , name of the app is very relevant, for example is your new tab will be a contact form the name it Contact. It is not just about name of tab, it can be changed but it is about page title when user will click on the icon of your app. The icon can be setup later. Let’s have the tab working.
See image below as sample and fill in with your details
You can setup and use the application (tab) but you must have SSL installed on your website!
As far as I see if you are developer of the app and you try to see your result (tab content) you will get error generated by the missing SSL. If you open a new browser and access the same tab (login in facebook or not) there will be no error.

Save and wait a few minutes/hours or no need to wait. Why? Because it depends of Facebook “mood”. Try next steps once you finish this one. If it works means you are luck, does not work yet: check all above and it means “bad luck”. Keep trying, never give up.
3. make sure you have your in your website setup the path specified above, I mean: http://www.sydneywebs.com.au/facebook/about/ folder and that a file named index.php or index.html does exist into that folder
What will be in that page (index.php) will be displayed into your new tab on facebook
4. When you consider, login in Facebook, into that account that is admin for the page in which you wish to add the tab and write in browser :
For page, you will be asked to chose the page where you wish to be displayed this tab. To that page into applications area will be added your app.
More tabs you need then more apps you need to setup. One tab you wish to have = one apps like this you will add.
As usual Facebook keep changing, improving and driving nuts many developers and users.
How to have however a new tab into your page on Facebook and in personal profile
1. Go to your https://developers.facebook.com/apps (if you have not account there just create one, it is fast and free – follow the instructions)
2. Create an app , take care , name of the app is very relevant, for example is your new tab will be a contact form the name it Contact. It is not just about name of tab, it can be changed but it is about page title when user will click on the icon of your app. The icon can be setup later. Let’s have the tab working.
See image below as sample and fill in with your details
You can setup and use the application (tab) but you must have SSL installed on your website!
- If your page (tab) will be browsed by a user who is not log into facebook then the facebook url is http://facebook.com/YOUR_FACEBOOK_PAGE. All good and your tab will be displayed okay.
- If your page (tab) will be browsed by a user who is log into facebook then the facebook url is https://facebook.com/YOUR_FACEBOOK_PAGE. Your page (TAB) will try to load your content on https:// and if you have not SSL installed then an error will be displayed.
As far as I see if you are developer of the app and you try to see your result (tab content) you will get error generated by the missing SSL. If you open a new browser and access the same tab (login in facebook or not) there will be no error.
Save and wait a few minutes/hours or no need to wait. Why? Because it depends of Facebook “mood”. Try next steps once you finish this one. If it works means you are luck, does not work yet: check all above and it means “bad luck”. Keep trying, never give up.
3. make sure you have your in your website setup the path specified above, I mean: http://www.sydneywebs.com.au/facebook/about/ folder and that a file named index.php or index.html does exist into that folder
What will be in that page (index.php) will be displayed into your new tab on facebook
4. When you consider, login in Facebook, into that account that is admin for the page in which you wish to add the tab and write in browser :
- To display tab in your page (personal): call in a browser: https://www.facebook.com/dialog/oauth?client_id=YOUR_APP_ID&redirect_uri=YOUR_CANVAS_PAGE
- To display tab in business page: call in a browser: https://www.facebook.com/dialog/pagetab?app_id=YOUR_APP_ID&next=YOUR_CANVAS_PAGE
For page, you will be asked to chose the page where you wish to be displayed this tab. To that page into applications area will be added your app.
More tabs you need then more apps you need to setup. One tab you wish to have = one apps like this you will add.
Subscribe to:
Posts (Atom)