Howto forge released a good tutorial on resizing your ext3 partitions
without loosing any data on it. It covers shrinking,enlarging and
merging of ext3 partitions. If you don’t don’t use LVM then this
tutorial would be good for you.
Access the tutorial here.
Howto forge homepage.
Showing posts with label linux. Show all posts
Showing posts with label linux. Show all posts
Tuesday, November 27, 2012
Setting the root password on MySQL
I just installed MySQL version 4.1.20 on my CentOS 4.4
server. The default install of MySQL server uses a blank password for
root so I had to have it changed. I also set the MySQL service to start
up every time my machine boots up.
This is how I did it;
Method 1
1. # yum -y install mysql-server (This will install the mysql binaries)
2. # chkconfig mysqld on (Adds mysqld to the startup services)
3. # service mysqld start (Starts the MySQL server)
4. # mysql -u root@localhost (Brings up the MySQL console)
5. #mysql> set password for root=password(‘password’); (Sets the root password to “password”)
6. #mysql> reload privileges; (Reloads the grant tables)
Method 2
1. # mysql -u root (Brings up the MySQL console)
2. #mysql> use mysql (Use the mysql database)
3. #mysql> update user
-> set password=password(“password”) (Sets the root password to “password”)
-> where user=”root”;
4. # reload privileges; (Reloads the grant tables)
That’s it, the next time you want to get the MySQL console up you’ll have to run #mysql -u root -p to get the password prompt.
Post-Installation Setup and Testing at MySQL
Update:
This will work too.
/usr/bin/mysqladmin -u root password ‘new-password’
/usr/bin/mysqladmin -u root -h pandora.crib password ‘new-password’
.htaccess password generator
Use this tool at Dynamic Drive
to automatically generate all the code needed to protect a directory on
your site. Below are the 2 files generated by the tool. .htaccess goes
into the folder that you want to protect and .htpasswd should be in a
folder not accessible from the web. I normally put my .htpasswd file in
my apache’s base folder.
.htaccess file
.htpasswd file
Get the tool here.
.htaccess file
AuthName "Restricted Area"

AuthType Basic

AuthUserFile /home/mydir/.htpasswd

AuthGroupFile /dev/null

require valid-user
.htpasswd file
danny:8UAaVrlw.58f6Get the tool here.
Screen | Linux Command
When you run commands and programs in a command prompt on Linux, the
programs or commands only run while the command prompt session is open
but as soon as the command prompt session is terminated for whatever
reason, the commands or programs running within the command prompt
session will also get terminated.
I use wget to download files from the internet using my putty console all the time. Imagine downloading a 500mb file and then suddenly putty crashes causing my session to terminate along with it. There goes my 500mb file download!! I so wished I had known about the “Screen” program then.
The screen program is a magnificent utility. Screen basically starts a session within the the session that you logged in with. So, if your putty session suddenly crashed don’t worry, the screen session would still be running in the background. Log in again to the server using putty and you should be able to retrieve the screen session you initiated earlier.
# screen
This starts a screen session.
# Ctrl + A followed by D
This will detach your screen session and return you to the original session you logged in with. Your screen session will now be running in the background.
# screen -r
This command will resume your previous screen session.
# Ctrl + A followed by Ctrl + (back slash)
# exit
You could run either command above to end a screen session.
# Ctrl + A followed by “
This command will list all the available screen sessions running if there are.
Usefull Links:
O’REILLY Linux Command Directory
Inside Open Source
-bash: /usr/bin/crontab: Permission denied
” -bash: /usr/bin/crontab: Permission denied “.
I was getting this error earlier today while trying to add cron jobs for my login on my SLES 10 box at work. Turns out that all users in SLES 10 by default have no access to cron.
The fix is to add the user to the “trusted” group in the group file (/etc/group). Let’s assume mu login is “elf”.
1. Make sure you are “root”.
2. #usermod -G trusted elf
This will add the user to the “trusted” group.
3. #id elf
Display groups the user belongs to. Make sure “trusted” is on the list too.
The output might look like this. “uid=502(danny) gid=502(users) groups=502(elf),11(trusted)”
4. #su – elf
Change user
5. #crontab -e
Add/Remove/Edit user cron jobs.
6. #crontab -l
List user scheduled cron jobs
Please do comment if you have an alternative way to accomplish this or if I made a mistake.
Bash and command line keyboard shortcuts
Shortcut keys for the bash and commad line interface.
Ctrl + A – Moves cursor to begining of line.
Ctrl + E – Moves cursor to end fo line.
Ctrl + K – Clears command line from cursor position till end of line.
Ctrl + U – Clears command line from cursor position till begining of line.
Ctrl + W – Clears first word to the left from cursor position.
Ctrl + Y – Paste any value previously deleted by Ctrl+K,Ctrl+U and Ctrl+W.
Tab Key – Auto compelte a partial typed command.
Ctrl + R – Followed by characters with search through the recent command history.
Crtl + D – Quits bash if used in a blank command line.
Ctrl + L – Screen refresh.
Ctrl + C – Kills current process.
Ctrl + Z – Suspend a process. Use command “bg” to execute the process in the background and “fg” to bring the process back to the foreground. The command “jobs” will list the available processes you can manipulate.
That’s it. Hope the commands help you. If i missed out anything please do comment.
SSH Tunneling with Putty | Linux
SSH tunneling or also known as port forwarding is a way of forwarding
normally insecure TCP traffic through SSH. Common ports for example
POP3,SMTP,HTTP and FTP can be easily tunneled using SSH.
SSH tunneling is also sometimes used to bypass firewalls where certain ports are blocked.
The figure below represents the network setup at my workplace where the only port available to use is SSH port 22. By implementing portwarding over ssh I am able to port forward Oracle traffic over port 22 to my Oracle DB database running on my private VM with host only networking enabled.

In this post I will show you how to apply SSH tunneling using the windows SSH client Putty. I’ll cover the Linux implementation in my future post.
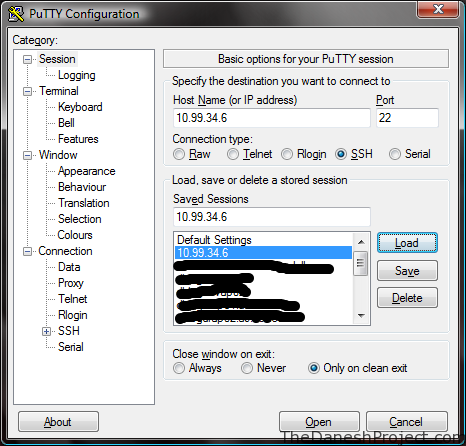
You will need Putty to get started. Putty is a popular free win32 based SSH/Telnet client. Obtain the latest version 0.59 at the homepage.
Putty Home | Putty Download
Run Putty, key in the address for your Linux box. In this example “10.99.34.6″ “Pandora” is the Linux box hosting VM and on the VM “192.168.66.100″ the is an Oracle database running on RHEL 3. The VM is setup with host only networking so it has no access beyond the host machine “Pandora”.

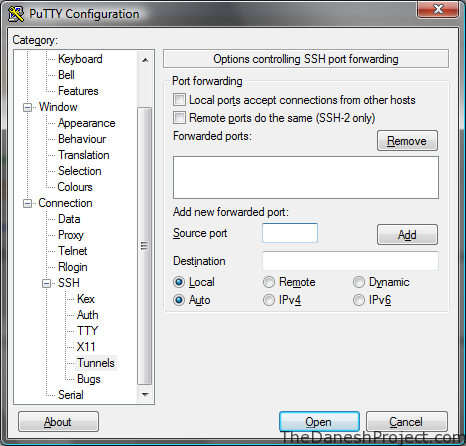
Look for the SSH tree entry in the menu to the left. Expand it and go to “Tunnels”.

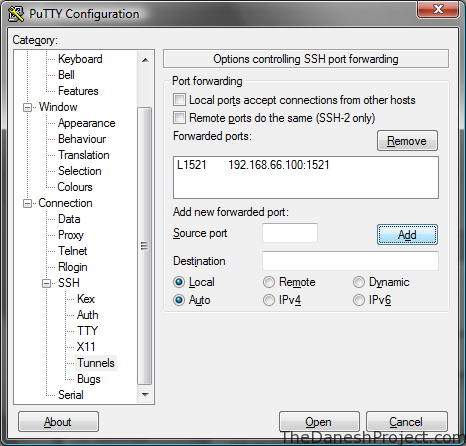
Fill the the required information and click add.
Source Port: 1521
Destination: 192.168.66.100:1521
“Source port” is the port Putty will listen on for incoming connections.
“Destination” is the destination port we are trying to access. In this example the Oracle listener is listening on port 1521 for incoming traffic so we use that.
“1521″ is the standard Oracle listener port.

Remember to save the session in the session page.
Open Putty and login to the Linux box “Pandora” and port forwarding should be up.
That’s it, have fun.
SSH tunneling is also sometimes used to bypass firewalls where certain ports are blocked.
The figure below represents the network setup at my workplace where the only port available to use is SSH port 22. By implementing portwarding over ssh I am able to port forward Oracle traffic over port 22 to my Oracle DB database running on my private VM with host only networking enabled.
In this post I will show you how to apply SSH tunneling using the windows SSH client Putty. I’ll cover the Linux implementation in my future post.
You will need Putty to get started. Putty is a popular free win32 based SSH/Telnet client. Obtain the latest version 0.59 at the homepage.
Putty Home | Putty Download
Run Putty, key in the address for your Linux box. In this example “10.99.34.6″ “Pandora” is the Linux box hosting VM and on the VM “192.168.66.100″ the is an Oracle database running on RHEL 3. The VM is setup with host only networking so it has no access beyond the host machine “Pandora”.
Look for the SSH tree entry in the menu to the left. Expand it and go to “Tunnels”.
Fill the the required information and click add.
Source Port: 1521
Destination: 192.168.66.100:1521
“Source port” is the port Putty will listen on for incoming connections.
“Destination” is the destination port we are trying to access. In this example the Oracle listener is listening on port 1521 for incoming traffic so we use that.
“1521″ is the standard Oracle listener port.
Remember to save the session in the session page.
Open Putty and login to the Linux box “Pandora” and port forwarding should be up.
That’s it, have fun.
Duplicate ssh sessions without password prompt
I work with multiple ssh sessions whenever I connect to a server.
Typically I would have about 3 sessions initiated from my host machine
to the destination server.
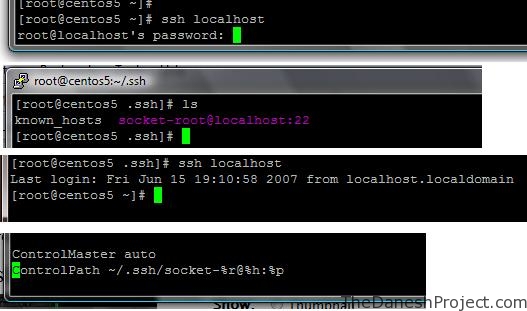
Found away to duplicate my session without retyping my password every time I initiate a connection the the server from my host machine thanks to Linux By Examples.
Add the following 2 lines to your /etc/ssh/ssh_config file and feature will be ready for you to use once you restart the sshd service.
ControlMaster auto
ControlPath ~/.ssh/socket-%r@%h:%p

ControlMaster
Enables the sharing of multiple sessions over a single
network connection.  When set to “yes” ssh will
listen for connections on a control socket specified
using the ControlPath argument. Additional sessions
can connect to this socket using the same ControlPath
with ControlMaster set to “no” (the default). These
sessions will reuse the master instance’s network con-
nection rather than initiating new ones. Setting this
to “ask” will cause ssh to listen for control connec-
tions, but require confirmation using the SSH_ASKPASS
program before they are accepted (see ssh-add(1) for
details).
ControlPath
Specify the path to the control socket used for
connection sharing. See ControlMaster above.
Found away to duplicate my session without retyping my password every time I initiate a connection the the server from my host machine thanks to Linux By Examples.
Add the following 2 lines to your /etc/ssh/ssh_config file and feature will be ready for you to use once you restart the sshd service.
ControlMaster auto
ControlPath ~/.ssh/socket-%r@%h:%p
ControlMaster
Enables the sharing of multiple sessions over a single
network connection.  When set to “yes” ssh will
listen for connections on a control socket specified
using the ControlPath argument. Additional sessions
can connect to this socket using the same ControlPath
with ControlMaster set to “no” (the default). These
sessions will reuse the master instance’s network con-
nection rather than initiating new ones. Setting this
to “ask” will cause ssh to listen for control connec-
tions, but require confirmation using the SSH_ASKPASS
program before they are accepted (see ssh-add(1) for
details).
ControlPath
Specify the path to the control socket used for
connection sharing. See ControlMaster above.
How to change the hostname in Linux
Changing your Linux machine’s hostname is easy. Just follow the steps below.
root# hostname [new-host-name]
root# vi /etc/sysconfig/network
HOSTNAME=[new-host-name]
root# vi /etc/hosts
Make sure your new host is updated in the hosts file.
root# service network restart
Done!!
root# hostname [new-host-name]
root# vi /etc/sysconfig/network
HOSTNAME=[new-host-name]
root# vi /etc/hosts
Make sure your new host is updated in the hosts file.
root# service network restart
Done!!
Extract rar files in Linux
RAR is a proprietary compression format widely used today. It’s supposedly has 30% higher compression rate when compared with WinZip. If you download large torrent then chances are you are are already well acquainted with RAR.
I use RAR on my Windows and Linux boxes everyday and today I’ll show you how to extract RAR files from the Linux command line.
In Linux, to extract a RAR file you would use the unrar command. The unrar binaries are typically not included with the default Linux install so you will have to install them either through the package manager or by downloading binaries from rarlab.com
Let’s get to the HowTo now,
Extract a RAR file into the curren directory.
# unrar e [filename].rarExtract a RAR file with the full file path.
# unrar x [filename].rarList contents of a RAR file
# unrar l [filename].rarTest intergruty of a RAR file
# unrar t [filename].rarIf you face any problems obtaining,installing or using unrar please contact me. I will be glad to help.
Shell script scripts to restart firefox
My Firefox freezes up when I have too many flash videos loading at
the same time. Wrote a simple script to restart Firefox every time this
happens.
I will be adding more functionality to the script in the future. Once sure feature will be the ability to choose either to kill all running instances or just kill a specific instance.#!/bin/bash
#simple script to kill and restart firefox
#20th August 2007
#Writen by Danesh aka Danny
#http://thedaneshproject.com
#
#look for the firefox PID
PID=`ps -ef | grep firefox-bin | grep -v grep | awk ‘{print $2}’`
#locate firefox executable
FIRE=`which firefox`
#kill firefox
CMD=�kill -9 $PID�
`$CMD`
#pause for 2 seconds
`sleep 2`
#start firefox
CMD=�$FIRE�
`$CMD &`
#End of script
Extract ZIP files in Linux
ZIP archives are most commonly used in Windows/MS-DOS based environments.
In Linux, you can use the “unzip” command to extract,list or test ZIP files. Below are the common tasks I use “unzip” for.
Extract the contents of a ZIP file into it’s own directory and also create subdirectories as needed.
In Linux, you can use the “unzip” command to extract,list or test ZIP files. Below are the common tasks I use “unzip” for.
Extract the contents of a ZIP file into it’s own directory and also create subdirectories as needed.
# unzip [filename].zipExtract the contents of a ZIP file into the current directory only. No subdirectories will be created.
# unzip -j [filename].zipExtract the contents of a ZIp file into a custom directory.
# unzip -d [target directory] [filename].zipList the contents of a ZIP file.
# unzip -l [filename].zipTest the integrity of a ZIP file and it’s contents.
 # unzip -t [filename].zipExtract the contents of a ZIP file only if the files already exist in the target directory. Good for upgrades.
# unzip -tq [filename].zip (Only shows summary)
# unzip -f [filename].zipExtract the contents of a ZIP file if the contents are newer then what’s available in the target directory or don’t exist yet. Good for upgrades.
# unzip -fo [filename].zip (non interactive. Yes to all)
# unzip -u [filename].zipDid this help? If you need further information please drop me a comment.
# unzip -uo [filename].zip (non interactive. Yes to all)
Users, Shutdowns and Reboots
The “last” command. Not many people I know use it but there are a
quite a few things one could do with it often. Let’s look at users,
shutdowns and reboots.
The “last or lastb” command is typically used to show a listing of the last logged in/out users. To view when a particular user last logged in run “last [username]“. See output below.
The “last or lastb” command is typically used to show a listing of the last logged in/out users. To view when a particular user last logged in run “last [username]“. See output below.
[root@nosebleed ~]# last danny
danny    pts/1        ftmtj1s.crib     Wed Oct 24 16:51   still logged in
danny    pts/0        python.crib      Wed Oct 24 16:10   still logged in
danny    pts/0        ftmtj1s.crib     Wed Oct 24 14:44 - crash  (01:07)
danny    pts/0        python.crib      Tue Oct 23 16:59 - 17:22  (00:22)
danny    pts/2        python.crib      Tue Oct 23 16:25 - down   (00:32)
danny    pts/1        python.crib      Tue Oct 23 16:09 - down   (00:47)
danny    pts/1        python.crib      Tue Oct 23 16:09 - 16:09  (00:00)
danny    pts/0        ftmtj1s.crib     Tue Oct 23 13:22 - down   (03:34)
danny    pts/0        ftmtj1s.crib     Mon Oct 22 01:18 - 01:43  (00:25)
danny    pts/0        ftmtj1s.crib     Sun Oct 21 01:34 - 21:06  (19:31)
danny    pts/0        ftmtj1s.crib     Sat Oct 20 13:58 - 14:01  (00:03)
danny    pts/0        ftmtj1s.crib     Fri Oct 19 16:52 - 00:23  (07:31)
danny    pts/0        python.crib      Fri Oct 19 11:49 - 14:15  (02:25)
danny    pts/0        python.crib      Thu Oct 18 15:27 - 15:37  (00:09)
danny    pts/0        python.crib      Thu Oct 18 15:22 - 15:23  (00:01)
danny    pts/1        192.168.0.65     Thu Oct 18 15:13 - 15:18  (00:05)
danny    pts/1        192.168.0.65     Thu Oct 18 14:38 - 15:13  (00:35)
Each time time the “reboot” command is executed the “reboot” user logs in. Running the “last reboot” command would then show the last reboot events. See out put below.
[root@nosebleed ~]# last reboot
reboot   system boot  2.6.18-8.1.14.el Wed Oct 24 15:51          (01:28)
reboot   system boot  2.6.18-8.1.14.el Tue Oct 23 16:59         (1+00:20)
reboot   system boot  2.6.18-8.1.10.el Thu Oct 18 14:30         (5+02:27)
reboot   system boot  2.6.18-8.1.10.el Wed Oct 17 02:05         (1+11:36)
reboot   system boot  2.6.18-8.1.10.el Tue Oct 16 23:00         (1+14:41)
reboot   system boot  2.6.18-8.1.10.el Tue Oct 16 21:05          (01:52)
reboot   system boot  2.6.18-8.1.10.el Fri Oct 12 22:27         (3+16:41)
If you only need halt and shutdown information. Running “last -x | grep down” will do that. See output below.
[root@nosebleed ~]# last -x | grep down
shutdown system down  2.6.18-8.1.10.el Tue Oct 23 16:58 - 17:22 (1+00:24)
danny    pts/2        python.crib      Tue Oct 23 16:25 - down   (00:32)
danny    pts/1        python.crib      Tue Oct 23 16:09 - down   (00:47)
danny    pts/0        ftmtj1s.crib     Tue Oct 23 13:22 - down   (03:34)
shutdown system down  2.6.18-8.1.10.el Thu Oct 18 13:42 - 16:57 (5+03:15)
danny    pts/3        ftmtj1s.crib     Thu Oct 18 13:28 - down   (00:12)
danny    pts/2        ftmtj1s.crib     Thu Oct 18 13:11 - down   (00:30)
danny    pts/1        192.168.0.65     Thu Oct 18 00:51 - down   (12:49)
danny    pts/0        192.168.0.65     Wed Oct 17 22:08 - down   (15:32)
shutdown system down  2.6.18-8.1.10.el Tue Oct 16 22:58 - 13:41 (1+14:42)
root     tty1                          Tue Oct 16 21:06 - down   (01:51)
shutdown system down  2.6.18-8.1.10.el Tue Oct 16 15:09 - 22:58  (07:48)
danny    pts/0        192.168.0.65     Tue Oct 16 15:04 - down   (00:04)
shutdown system down  2.6.18-8.1.10.el Fri Oct 12 22:25 - 15:08 (3+16:43)
Hope this helped, drop me a comment if you need info.
Alias command in Linux
The alias command is used to create shortcuts to commands. Let’s see how it works.
I use the alias command to create shortcuts for commands I use frequently. For example the cp(copy) and mv(move) commands, my alias simply adds -i to cp and mv commands causing them to be interactive thus preventing any accidental deletes or file overwrites.
Running the alias command will show you all the current aliases available.

alias mv=’mv -i’. This command will ad -i to the mv(move) command. Now, every time the mv command is executed it will be interactive. No more accidental overwrites
I use the alias command to create shortcuts for commands I use frequently. For example the cp(copy) and mv(move) commands, my alias simply adds -i to cp and mv commands causing them to be interactive thus preventing any accidental deletes or file overwrites.
Running the alias command will show you all the current aliases available.
[dummy@macho ~]$ aliasalias cp=’cp -i’. This command will ad -i to the cp(copy) command. Now, every time the cp command is executed it will be interactive. No more accidental deletes
alias l.=’ls -d .* –color=tty’
alias ll=’ls -l –color=tty’
alias ls=’ls –color=tty’
alias vi=’vim’
alias mv=’mv -i’. This command will ad -i to the mv(move) command. Now, every time the mv command is executed it will be interactive. No more accidental overwrites
[dummy@macho ~]$ alias cp=’cp -i’
[dummy@macho ~]$ alias mv=’mv-i’
[dummy@macho ~]$ alias
alias cp=’cp -i’
alias l.=’ls -d .* –color=tty’
alias ll=’ls -l –color=tty’
alias ls=’ls –color=tty’
alias mv=’mv-i’
alias vi=’vim’
Password protect single user mode
You forget your root password and get locked out of your own box.
What do you do? Typically, you would reboot into single user mode and
change the password there.
When booting into single user mode you will not be prompted for the root password. This is something every attacker knows and prays on once he has gained physical access to you box. So what do you do?
Firstly, a good sys admin knows not to forget the root password. Login in as root is never a good idea so using sudo is always advised. This still leaves the single user mode vulnerable, to secure it you will have to append the following line “su:S:wait:/sbin/sulogin” to your “/etc/inittab” file. Now, every time you boot into single user mode you will be prompted for the root password.
See sample below,
# password protect single user modePS: Always remember you password, if you can’t then write in down in a safe place.
su:S:wait:/sbin/sulogin
Server time slow
Another issue that popped up tonight. The time on a payroll server
seem to be slower then usual. Futher troubleshooting on the box revealed
that it took 4 seconds to move 1 second on the server. This caused the
payroll servers to stop communicating between each other as time sync
was part of a security measure built into the payroll software we run
here.
Some googling later it seem to be a BUG with the kernel. The fix, suggested to either update the kernel, recompile the kernel or add some kernel parameters in GRUB to fix the issue. I decided to go with the kernel parameters because this was a production server and the downtime window was very slim.
The fix,
Source: Linux Kernel Parameters
Some googling later it seem to be a BUG with the kernel. The fix, suggested to either update the kernel, recompile the kernel or add some kernel parameters in GRUB to fix the issue. I decided to go with the kernel parameters because this was a production server and the downtime window was very slim.
The fix,
- vi /etc/boot/grub.conf
- Add to the end of the kernel line. “clock=pit noapic nolapic”
- reboot and check time. “watch date”
# grub.conf generated by anaconda
#
# Note that you do not have to rerun grub after making changes to this file
# NOTICE:  You have a /boot partition.  This means that
#          all kernel and initrd paths are relative to /boot/, eg.
#          root (hd0,0)
#          kernel /vmlinuz-version ro root=/dev/md7
#          initrd /initrd-version.img
#boot=/dev/sda
default=0
timeout=10
splashimage=(hd0,0)/grub/splash.xpm.gz
title Red Hat Linux (2.4.9-e.3smp)
root (hd0,0)
kernel /vmlinuz-2.4.9-e.3smp ro root=/dev/md7 clock=pit noapic nolapic
initrd /initrd-2.4.9-e.3smp.img
title Red Hat Linux Advanced Server (2.4.9-e.3)
root (hd0,0)
kernel /vmlinuz-2.4.9-e.3 ro root=/dev/md7 clock=pit noapic nolapic
initrd /initrd-2.4.9-e.3.img
Source: Linux Kernel Parameters
Select all files but one on linux
My friend wanted to know how to select all files but one on the CLI
or in a bash script. This is how I normally do it, do you know a better
way?
From the command line

From the command line
ls * | grep -v [pattern to ignore]ls [!pattern to ignore] *
for i in `ls * | grep -v [pattern to ignore]`
do
   do something here
done
How to find files in linux
Need to find files older than certain time frame? This will help, “find [dir] -type f -mtime +[24hours*n] ”
Examples,
Show files older than 7 days
Examples,
Show files older than 7 days
find /tmp/ -type f -mtime +7find /tmp/ -type f -mtime +7 -exec rm {} ;find /tmp/ -type f -mtime +7 | xargs rmHow to remove ^M character with VI
This is how you remove those annoying ^M characters that show up in files previously edited on a Windows/DOS platform.
In VI,
In VI,
:%s/[ctrlkey+v and ctrl-key+M]//g:%s/^V^M//gHow to increase file descriptors max limit on Linux
Today my DBA reported that the server she was working on was spitting
out “too many open files” errors and no new processes could be started.
This is a common problem with DB servers with heavy transactions. In my environment there are 6 DB instances running on the server. No quite the optimized setup I would say.
The fix was to increase the total file descriptors kernel parameter count in the /etc/sysctl.conf file. I doubled my limit from 8192 to 16384.
The walk through,
1. Find out what the current open file descriptor limit is.
~# more /proc/sys/fs/file-max

~# 8192
~# sysctl -a | grep fs.file-max

~# fs.file-max = 8192~# more /proc/sys/fs/file-nr
~# 8191~# lsof | wc -l
~# 10325~# vi /etc/sysctl.conf
fs.file-max = 331287~# sysctl -p
~# fs.file-max = 331287
Subscribe to:
Posts (Atom)