Shortcut keys for the bash and commad line interface.
Ctrl + A – Moves cursor to begining of line.
Ctrl + E – Moves cursor to end fo line.
Ctrl + K – Clears command line from cursor position till end of line.
Ctrl + U – Clears command line from cursor position till begining of line.
Ctrl + W – Clears first word to the left from cursor position.
Ctrl + Y – Paste any value previously deleted by Ctrl+K,Ctrl+U and Ctrl+W.
Tab Key – Auto compelte a partial typed command.
Ctrl + R – Followed by characters with search through the recent command history.
Crtl + D – Quits bash if used in a blank command line.
Ctrl + L – Screen refresh.
Ctrl + C – Kills current process.
Ctrl + Z – Suspend a process. Use command “bg” to execute the process
in the background and “fg” to bring the process back to the foreground.
The command “jobs” will list the available processes you can
manipulate.
That’s it. Hope the commands help you. If i missed out anything please do comment.
Tuesday, November 27, 2012
SSH Tunneling with Putty | Linux
SSH tunneling or also known as port forwarding is a way of forwarding
normally insecure TCP traffic through SSH. Common ports for example
POP3,SMTP,HTTP and FTP can be easily tunneled using SSH.
SSH tunneling is also sometimes used to bypass firewalls where certain ports are blocked.
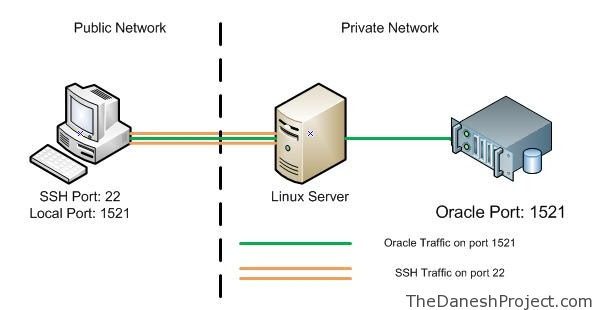
The figure below represents the network setup at my workplace where the only port available to use is SSH port 22. By implementing portwarding over ssh I am able to port forward Oracle traffic over port 22 to my Oracle DB database running on my private VM with host only networking enabled.

In this post I will show you how to apply SSH tunneling using the windows SSH client Putty. I’ll cover the Linux implementation in my future post.
You will need Putty to get started. Putty is a popular free win32 based SSH/Telnet client. Obtain the latest version 0.59 at the homepage.
Putty Home | Putty Download
Run Putty, key in the address for your Linux box. In this example “10.99.34.6″ “Pandora” is the Linux box hosting VM and on the VM “192.168.66.100″ the is an Oracle database running on RHEL 3. The VM is setup with host only networking so it has no access beyond the host machine “Pandora”.

Look for the SSH tree entry in the menu to the left. Expand it and go to “Tunnels”.

Fill the the required information and click add.
Source Port: 1521
Destination: 192.168.66.100:1521
“Source port” is the port Putty will listen on for incoming connections.
“Destination” is the destination port we are trying to access. In this example the Oracle listener is listening on port 1521 for incoming traffic so we use that.
“1521″ is the standard Oracle listener port.

Remember to save the session in the session page.
Open Putty and login to the Linux box “Pandora” and port forwarding should be up.
That’s it, have fun.
SSH tunneling is also sometimes used to bypass firewalls where certain ports are blocked.
The figure below represents the network setup at my workplace where the only port available to use is SSH port 22. By implementing portwarding over ssh I am able to port forward Oracle traffic over port 22 to my Oracle DB database running on my private VM with host only networking enabled.
In this post I will show you how to apply SSH tunneling using the windows SSH client Putty. I’ll cover the Linux implementation in my future post.
You will need Putty to get started. Putty is a popular free win32 based SSH/Telnet client. Obtain the latest version 0.59 at the homepage.
Putty Home | Putty Download
Run Putty, key in the address for your Linux box. In this example “10.99.34.6″ “Pandora” is the Linux box hosting VM and on the VM “192.168.66.100″ the is an Oracle database running on RHEL 3. The VM is setup with host only networking so it has no access beyond the host machine “Pandora”.
Look for the SSH tree entry in the menu to the left. Expand it and go to “Tunnels”.
Fill the the required information and click add.
Source Port: 1521
Destination: 192.168.66.100:1521
“Source port” is the port Putty will listen on for incoming connections.
“Destination” is the destination port we are trying to access. In this example the Oracle listener is listening on port 1521 for incoming traffic so we use that.
“1521″ is the standard Oracle listener port.
Remember to save the session in the session page.
Open Putty and login to the Linux box “Pandora” and port forwarding should be up.
That’s it, have fun.
Duplicate ssh sessions without password prompt
I work with multiple ssh sessions whenever I connect to a server.
Typically I would have about 3 sessions initiated from my host machine
to the destination server.
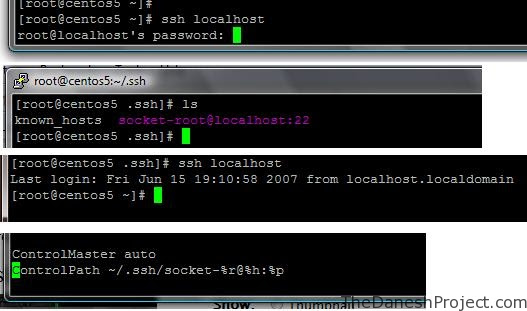
Found away to duplicate my session without retyping my password every time I initiate a connection the the server from my host machine thanks to Linux By Examples.
Add the following 2 lines to your /etc/ssh/ssh_config file and feature will be ready for you to use once you restart the sshd service.
ControlMaster auto
ControlPath ~/.ssh/socket-%r@%h:%p

ControlMaster
Enables the sharing of multiple sessions over a single
network connection.  When set to “yes” ssh will
listen for connections on a control socket specified
using the ControlPath argument. Additional sessions
can connect to this socket using the same ControlPath
with ControlMaster set to “no” (the default). These
sessions will reuse the master instance’s network con-
nection rather than initiating new ones. Setting this
to “ask” will cause ssh to listen for control connec-
tions, but require confirmation using the SSH_ASKPASS
program before they are accepted (see ssh-add(1) for
details).
ControlPath
Specify the path to the control socket used for
connection sharing. See ControlMaster above.
Found away to duplicate my session without retyping my password every time I initiate a connection the the server from my host machine thanks to Linux By Examples.
Add the following 2 lines to your /etc/ssh/ssh_config file and feature will be ready for you to use once you restart the sshd service.
ControlMaster auto
ControlPath ~/.ssh/socket-%r@%h:%p
ControlMaster
Enables the sharing of multiple sessions over a single
network connection.  When set to “yes” ssh will
listen for connections on a control socket specified
using the ControlPath argument. Additional sessions
can connect to this socket using the same ControlPath
with ControlMaster set to “no” (the default). These
sessions will reuse the master instance’s network con-
nection rather than initiating new ones. Setting this
to “ask” will cause ssh to listen for control connec-
tions, but require confirmation using the SSH_ASKPASS
program before they are accepted (see ssh-add(1) for
details).
ControlPath
Specify the path to the control socket used for
connection sharing. See ControlMaster above.
How to change the hostname in Linux
Changing your Linux machine’s hostname is easy. Just follow the steps below.
root# hostname [new-host-name]
root# vi /etc/sysconfig/network
HOSTNAME=[new-host-name]
root# vi /etc/hosts
Make sure your new host is updated in the hosts file.
root# service network restart
Done!!
root# hostname [new-host-name]
root# vi /etc/sysconfig/network
HOSTNAME=[new-host-name]
root# vi /etc/hosts
Make sure your new host is updated in the hosts file.
root# service network restart
Done!!
Extract rar files in Linux
RAR is a proprietary compression format widely used today. It’s supposedly has 30% higher compression rate when compared with WinZip. If you download large torrent then chances are you are are already well acquainted with RAR.
I use RAR on my Windows and Linux boxes everyday and today I’ll show you how to extract RAR files from the Linux command line.
In Linux, to extract a RAR file you would use the unrar command. The unrar binaries are typically not included with the default Linux install so you will have to install them either through the package manager or by downloading binaries from rarlab.com
Let’s get to the HowTo now,
Extract a RAR file into the curren directory.
# unrar e [filename].rarExtract a RAR file with the full file path.
# unrar x [filename].rarList contents of a RAR file
# unrar l [filename].rarTest intergruty of a RAR file
# unrar t [filename].rarIf you face any problems obtaining,installing or using unrar please contact me. I will be glad to help.
Shell script scripts to restart firefox
My Firefox freezes up when I have too many flash videos loading at
the same time. Wrote a simple script to restart Firefox every time this
happens.
I will be adding more functionality to the script in the future. Once sure feature will be the ability to choose either to kill all running instances or just kill a specific instance.#!/bin/bash
#simple script to kill and restart firefox
#20th August 2007
#Writen by Danesh aka Danny
#http://thedaneshproject.com
#
#look for the firefox PID
PID=`ps -ef | grep firefox-bin | grep -v grep | awk ‘{print $2}’`
#locate firefox executable
FIRE=`which firefox`
#kill firefox
CMD=�kill -9 $PID�
`$CMD`
#pause for 2 seconds
`sleep 2`
#start firefox
CMD=�$FIRE�
`$CMD &`
#End of script
Extract ZIP files in Linux
ZIP archives are most commonly used in Windows/MS-DOS based environments.
In Linux, you can use the “unzip” command to extract,list or test ZIP files. Below are the common tasks I use “unzip” for.
Extract the contents of a ZIP file into it’s own directory and also create subdirectories as needed.
In Linux, you can use the “unzip” command to extract,list or test ZIP files. Below are the common tasks I use “unzip” for.
Extract the contents of a ZIP file into it’s own directory and also create subdirectories as needed.
# unzip [filename].zipExtract the contents of a ZIP file into the current directory only. No subdirectories will be created.
# unzip -j [filename].zipExtract the contents of a ZIp file into a custom directory.
# unzip -d [target directory] [filename].zipList the contents of a ZIP file.
# unzip -l [filename].zipTest the integrity of a ZIP file and it’s contents.
 # unzip -t [filename].zipExtract the contents of a ZIP file only if the files already exist in the target directory. Good for upgrades.
# unzip -tq [filename].zip (Only shows summary)
# unzip -f [filename].zipExtract the contents of a ZIP file if the contents are newer then what’s available in the target directory or don’t exist yet. Good for upgrades.
# unzip -fo [filename].zip (non interactive. Yes to all)
# unzip -u [filename].zipDid this help? If you need further information please drop me a comment.
# unzip -uo [filename].zip (non interactive. Yes to all)
Subscribe to:
Posts (Atom)