I work with multiple ssh sessions whenever I connect to a server.
Typically I would have about 3 sessions initiated from my host machine
to the destination server.
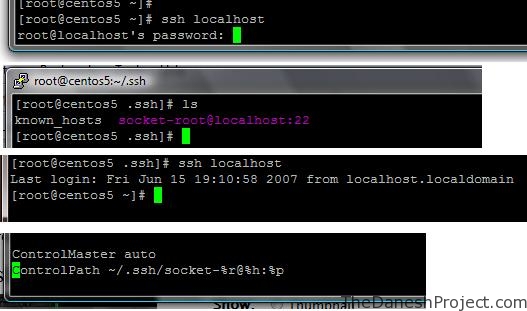
Found away to duplicate my session without retyping my password every
time I initiate a connection the the server from my host machine thanks
to Linux By Examples.
Add the following 2 lines to your /etc/ssh/ssh_config file and
feature will be ready for you to use once you restart the sshd service.
ControlMaster auto
ControlPath ~/.ssh/socket-%r@%h:%p
ControlMaster
Enables the sharing of multiple sessions over a single
network connection.  When set to “yes” ssh will
listen for connections on a control socket specified
using the ControlPath argument. Additional sessions
can connect to this socket using the same ControlPath
with ControlMaster set to “no” (the default). These
sessions will reuse the master instance’s network con-
nection rather than initiating new ones. Setting this
to “ask” will cause ssh to listen for control connec-
tions, but require confirmation using the SSH_ASKPASS
program before they are accepted (see ssh-add(1) for
details).
ControlPath
Specify the path to the control socket used for
connection sharing. See ControlMaster above.
Tuesday, November 27, 2012
How to change the hostname in Linux
Changing your Linux machine’s hostname is easy. Just follow the steps below.
root# hostname [new-host-name]
root# vi /etc/sysconfig/network
HOSTNAME=[new-host-name]
root# vi /etc/hosts
Make sure your new host is updated in the hosts file.
root# service network restart
Done!!
root# hostname [new-host-name]
root# vi /etc/sysconfig/network
HOSTNAME=[new-host-name]
root# vi /etc/hosts
Make sure your new host is updated in the hosts file.
root# service network restart
Done!!
Extract rar files in Linux
RAR is a proprietary compression format widely used today. It’s supposedly has 30% higher compression rate when compared with WinZip. If you download large torrent then chances are you are are already well acquainted with RAR.
I use RAR on my Windows and Linux boxes everyday and today I’ll show you how to extract RAR files from the Linux command line.
In Linux, to extract a RAR file you would use the unrar command. The unrar binaries are typically not included with the default Linux install so you will have to install them either through the package manager or by downloading binaries from rarlab.com
Let’s get to the HowTo now,
Extract a RAR file into the curren directory.
# unrar e [filename].rarExtract a RAR file with the full file path.
# unrar x [filename].rarList contents of a RAR file
# unrar l [filename].rarTest intergruty of a RAR file
# unrar t [filename].rarIf you face any problems obtaining,installing or using unrar please contact me. I will be glad to help.
Shell script scripts to restart firefox
My Firefox freezes up when I have too many flash videos loading at
the same time. Wrote a simple script to restart Firefox every time this
happens.
I will be adding more functionality to the script in the future. Once sure feature will be the ability to choose either to kill all running instances or just kill a specific instance.#!/bin/bash
#simple script to kill and restart firefox
#20th August 2007
#Writen by Danesh aka Danny
#http://thedaneshproject.com
#
#look for the firefox PID
PID=`ps -ef | grep firefox-bin | grep -v grep | awk ‘{print $2}’`
#locate firefox executable
FIRE=`which firefox`
#kill firefox
CMD=�kill -9 $PID�
`$CMD`
#pause for 2 seconds
`sleep 2`
#start firefox
CMD=�$FIRE�
`$CMD &`
#End of script
Extract ZIP files in Linux
ZIP archives are most commonly used in Windows/MS-DOS based environments.
In Linux, you can use the “unzip” command to extract,list or test ZIP files. Below are the common tasks I use “unzip” for.
Extract the contents of a ZIP file into it’s own directory and also create subdirectories as needed.
In Linux, you can use the “unzip” command to extract,list or test ZIP files. Below are the common tasks I use “unzip” for.
Extract the contents of a ZIP file into it’s own directory and also create subdirectories as needed.
# unzip [filename].zipExtract the contents of a ZIP file into the current directory only. No subdirectories will be created.
# unzip -j [filename].zipExtract the contents of a ZIp file into a custom directory.
# unzip -d [target directory] [filename].zipList the contents of a ZIP file.
# unzip -l [filename].zipTest the integrity of a ZIP file and it’s contents.
 # unzip -t [filename].zipExtract the contents of a ZIP file only if the files already exist in the target directory. Good for upgrades.
# unzip -tq [filename].zip (Only shows summary)
# unzip -f [filename].zipExtract the contents of a ZIP file if the contents are newer then what’s available in the target directory or don’t exist yet. Good for upgrades.
# unzip -fo [filename].zip (non interactive. Yes to all)
# unzip -u [filename].zipDid this help? If you need further information please drop me a comment.
# unzip -uo [filename].zip (non interactive. Yes to all)
Users, Shutdowns and Reboots
The “last” command. Not many people I know use it but there are a
quite a few things one could do with it often. Let’s look at users,
shutdowns and reboots.
The “last or lastb” command is typically used to show a listing of the last logged in/out users. To view when a particular user last logged in run “last [username]“. See output below.
[root@nosebleed ~]# last danny danny pts/1 ftmtj1s.crib Wed Oct 24 16:51 still logged in danny pts/0 python.crib Wed Oct 24 16:10 still logged in danny pts/0 ftmtj1s.crib Wed Oct 24 14:44 - crash (01:07) danny pts/0 python.crib Tue Oct 23 16:59 - 17:22 (00:22) danny pts/2 python.crib Tue Oct 23 16:25 - down (00:32) danny pts/1 python.crib Tue Oct 23 16:09 - down (00:47) danny pts/1 python.crib Tue Oct 23 16:09 - 16:09 (00:00) danny pts/0 ftmtj1s.crib Tue Oct 23 13:22 - down (03:34) danny pts/0 ftmtj1s.crib Mon Oct 22 01:18 - 01:43 (00:25) danny pts/0 ftmtj1s.crib Sun Oct 21 01:34 - 21:06 (19:31) danny pts/0 ftmtj1s.crib Sat Oct 20 13:58 - 14:01 (00:03) danny pts/0 ftmtj1s.crib Fri Oct 19 16:52 - 00:23 (07:31) danny pts/0 python.crib Fri Oct 19 11:49 - 14:15 (02:25) danny pts/0 python.crib Thu Oct 18 15:27 - 15:37 (00:09) danny pts/0 python.crib Thu Oct 18 15:22 - 15:23 (00:01) danny pts/1 192.168.0.65 Thu Oct 18 15:13 - 15:18 (00:05) danny pts/1 192.168.0.65 Thu Oct 18 14:38 - 15:13 (00:35)Each time time the “reboot” command is executed the “reboot” user logs in. Running the “last reboot” command would then show the last reboot events. See out put below.
[root@nosebleed ~]# last reboot reboot system boot 2.6.18-8.1.14.el Wed Oct 24 15:51 (01:28) reboot system boot 2.6.18-8.1.14.el Tue Oct 23 16:59 (1+00:20) reboot system boot 2.6.18-8.1.10.el Thu Oct 18 14:30 (5+02:27) reboot system boot 2.6.18-8.1.10.el Wed Oct 17 02:05 (1+11:36) reboot system boot 2.6.18-8.1.10.el Tue Oct 16 23:00 (1+14:41) reboot system boot 2.6.18-8.1.10.el Tue Oct 16 21:05 (01:52) reboot system boot 2.6.18-8.1.10.el Fri Oct 12 22:27 (3+16:41)If you only need halt and shutdown information. Running “last -x | grep down” will do that. See output below.
[root@nosebleed ~]# last -x | grep down shutdown system down 2.6.18-8.1.10.el Tue Oct 23 16:58 - 17:22 (1+00:24) danny pts/2 python.crib Tue Oct 23 16:25 - down (00:32) danny pts/1 python.crib Tue Oct 23 16:09 - down (00:47) danny pts/0 ftmtj1s.crib Tue Oct 23 13:22 - down (03:34) shutdown system down 2.6.18-8.1.10.el Thu Oct 18 13:42 - 16:57 (5+03:15) danny pts/3 ftmtj1s.crib Thu Oct 18 13:28 - down (00:12) danny pts/2 ftmtj1s.crib Thu Oct 18 13:11 - down (00:30) danny pts/1 192.168.0.65 Thu Oct 18 00:51 - down (12:49) danny pts/0 192.168.0.65 Wed Oct 17 22:08 - down (15:32) shutdown system down 2.6.18-8.1.10.el Tue Oct 16 22:58 - 13:41 (1+14:42) root tty1 Tue Oct 16 21:06 - down (01:51) shutdown system down 2.6.18-8.1.10.el Tue Oct 16 15:09 - 22:58 (07:48) danny pts/0 192.168.0.65 Tue Oct 16 15:04 - down (00:04) shutdown system down 2.6.18-8.1.10.el Fri Oct 12 22:25 - 15:08 (3+16:43)Hope this helped, drop me a comment if you need info.
Alias command in Linux
The alias command is used to create shortcuts to commands. Let’s see how it works.
I use the alias command to create shortcuts for commands I use frequently. For example the cp(copy) and mv(move) commands, my alias simply adds -i to cp and mv commands causing them to be interactive thus preventing any accidental deletes or file overwrites.
Running the alias command will show you all the current aliases available.
alias mv=’mv -i’. This command will ad -i to the mv(move) command. Now, every time the mv command is executed it will be interactive. No more accidental overwrites
I use the alias command to create shortcuts for commands I use frequently. For example the cp(copy) and mv(move) commands, my alias simply adds -i to cp and mv commands causing them to be interactive thus preventing any accidental deletes or file overwrites.
Running the alias command will show you all the current aliases available.
[dummy@macho ~]$ aliasalias cp=’cp -i’. This command will ad -i to the cp(copy) command. Now, every time the cp command is executed it will be interactive. No more accidental deletes
alias l.=’ls -d .* –color=tty’
alias ll=’ls -l –color=tty’
alias ls=’ls –color=tty’
alias vi=’vim’
alias mv=’mv -i’. This command will ad -i to the mv(move) command. Now, every time the mv command is executed it will be interactive. No more accidental overwrites
[dummy@macho ~]$ alias cp=’cp -i’
[dummy@macho ~]$ alias mv=’mv-i’
[dummy@macho ~]$ alias
alias cp=’cp -i’
alias l.=’ls -d .* –color=tty’
alias ll=’ls -l –color=tty’
alias ls=’ls –color=tty’
alias mv=’mv-i’
alias vi=’vim’
Subscribe to:
Posts (Atom)