Howto forge released a good tutorial on resizing your ext3 partitions
without loosing any data on it. It covers shrinking,enlarging and
merging of ext3 partitions. If you don’t don’t use LVM then this
tutorial would be good for you.
Access the tutorial here.
Howto forge homepage.
Tuesday, November 27, 2012
Setting the root password on MySQL
I just installed MySQL version 4.1.20 on my CentOS 4.4
server. The default install of MySQL server uses a blank password for
root so I had to have it changed. I also set the MySQL service to start
up every time my machine boots up.
This is how I did it;
Method 1
1. # yum -y install mysql-server (This will install the mysql binaries)
2. # chkconfig mysqld on (Adds mysqld to the startup services)
3. # service mysqld start (Starts the MySQL server)
4. # mysql -u root@localhost (Brings up the MySQL console)
5. #mysql> set password for root=password(‘password’); (Sets the root password to “password”)
6. #mysql> reload privileges; (Reloads the grant tables)
Method 2
1. # mysql -u root (Brings up the MySQL console)
2. #mysql> use mysql (Use the mysql database)
3. #mysql> update user
-> set password=password(“password”) (Sets the root password to “password”)
-> where user=”root”;
4. # reload privileges; (Reloads the grant tables)
That’s it, the next time you want to get the MySQL console up you’ll have to run #mysql -u root -p to get the password prompt.
Post-Installation Setup and Testing at MySQL
Update:
This will work too.
/usr/bin/mysqladmin -u root password ‘new-password’
/usr/bin/mysqladmin -u root -h pandora.crib password ‘new-password’
.htaccess password generator
Use this tool at Dynamic Drive
to automatically generate all the code needed to protect a directory on
your site. Below are the 2 files generated by the tool. .htaccess goes
into the folder that you want to protect and .htpasswd should be in a
folder not accessible from the web. I normally put my .htpasswd file in
my apache’s base folder.
.htaccess file
.htpasswd file
Get the tool here.
.htaccess file
AuthName "Restricted Area"

AuthType Basic

AuthUserFile /home/mydir/.htpasswd

AuthGroupFile /dev/null

require valid-user
.htpasswd file
danny:8UAaVrlw.58f6Get the tool here.
Screen | Linux Command
When you run commands and programs in a command prompt on Linux, the
programs or commands only run while the command prompt session is open
but as soon as the command prompt session is terminated for whatever
reason, the commands or programs running within the command prompt
session will also get terminated.
I use wget to download files from the internet using my putty console all the time. Imagine downloading a 500mb file and then suddenly putty crashes causing my session to terminate along with it. There goes my 500mb file download!! I so wished I had known about the “Screen” program then.
The screen program is a magnificent utility. Screen basically starts a session within the the session that you logged in with. So, if your putty session suddenly crashed don’t worry, the screen session would still be running in the background. Log in again to the server using putty and you should be able to retrieve the screen session you initiated earlier.
# screen
This starts a screen session.
# Ctrl + A followed by D
This will detach your screen session and return you to the original session you logged in with. Your screen session will now be running in the background.
# screen -r
This command will resume your previous screen session.
# Ctrl + A followed by Ctrl + (back slash)
# exit
You could run either command above to end a screen session.
# Ctrl + A followed by “
This command will list all the available screen sessions running if there are.
Usefull Links:
O’REILLY Linux Command Directory
Inside Open Source
-bash: /usr/bin/crontab: Permission denied
” -bash: /usr/bin/crontab: Permission denied “.
I was getting this error earlier today while trying to add cron jobs for my login on my SLES 10 box at work. Turns out that all users in SLES 10 by default have no access to cron.
The fix is to add the user to the “trusted” group in the group file (/etc/group). Let’s assume mu login is “elf”.
1. Make sure you are “root”.
2. #usermod -G trusted elf
This will add the user to the “trusted” group.
3. #id elf
Display groups the user belongs to. Make sure “trusted” is on the list too.
The output might look like this. “uid=502(danny) gid=502(users) groups=502(elf),11(trusted)”
4. #su – elf
Change user
5. #crontab -e
Add/Remove/Edit user cron jobs.
6. #crontab -l
List user scheduled cron jobs
Please do comment if you have an alternative way to accomplish this or if I made a mistake.
Bash and command line keyboard shortcuts
Shortcut keys for the bash and commad line interface.
Ctrl + A – Moves cursor to begining of line.
Ctrl + E – Moves cursor to end fo line.
Ctrl + K – Clears command line from cursor position till end of line.
Ctrl + U – Clears command line from cursor position till begining of line.
Ctrl + W – Clears first word to the left from cursor position.
Ctrl + Y – Paste any value previously deleted by Ctrl+K,Ctrl+U and Ctrl+W.
Tab Key – Auto compelte a partial typed command.
Ctrl + R – Followed by characters with search through the recent command history.
Crtl + D – Quits bash if used in a blank command line.
Ctrl + L – Screen refresh.
Ctrl + C – Kills current process.
Ctrl + Z – Suspend a process. Use command “bg” to execute the process in the background and “fg” to bring the process back to the foreground. The command “jobs” will list the available processes you can manipulate.
That’s it. Hope the commands help you. If i missed out anything please do comment.
SSH Tunneling with Putty | Linux
SSH tunneling or also known as port forwarding is a way of forwarding
normally insecure TCP traffic through SSH. Common ports for example
POP3,SMTP,HTTP and FTP can be easily tunneled using SSH.
SSH tunneling is also sometimes used to bypass firewalls where certain ports are blocked.
The figure below represents the network setup at my workplace where the only port available to use is SSH port 22. By implementing portwarding over ssh I am able to port forward Oracle traffic over port 22 to my Oracle DB database running on my private VM with host only networking enabled.

In this post I will show you how to apply SSH tunneling using the windows SSH client Putty. I’ll cover the Linux implementation in my future post.
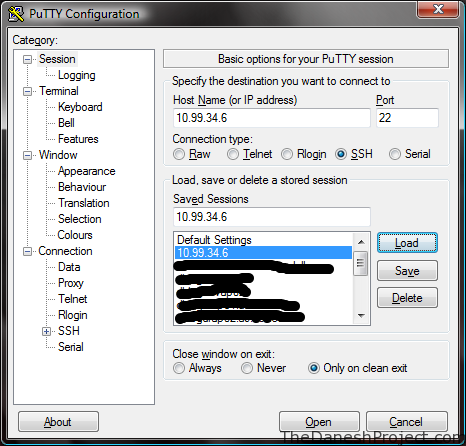
You will need Putty to get started. Putty is a popular free win32 based SSH/Telnet client. Obtain the latest version 0.59 at the homepage.
Putty Home | Putty Download
Run Putty, key in the address for your Linux box. In this example “10.99.34.6″ “Pandora” is the Linux box hosting VM and on the VM “192.168.66.100″ the is an Oracle database running on RHEL 3. The VM is setup with host only networking so it has no access beyond the host machine “Pandora”.

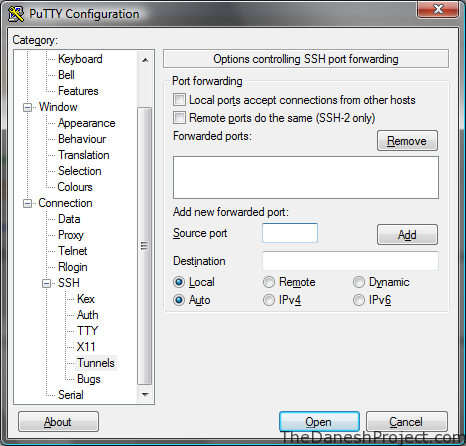
Look for the SSH tree entry in the menu to the left. Expand it and go to “Tunnels”.

Fill the the required information and click add.
Source Port: 1521
Destination: 192.168.66.100:1521
“Source port” is the port Putty will listen on for incoming connections.
“Destination” is the destination port we are trying to access. In this example the Oracle listener is listening on port 1521 for incoming traffic so we use that.
“1521″ is the standard Oracle listener port.

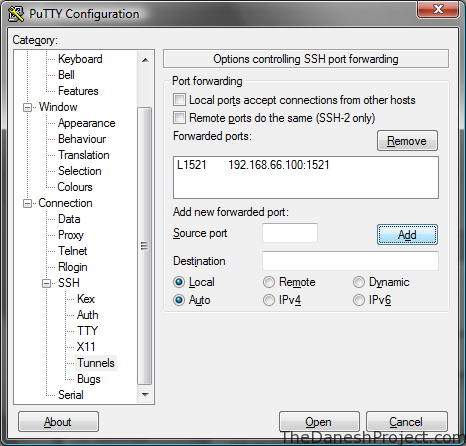
Remember to save the session in the session page.
Open Putty and login to the Linux box “Pandora” and port forwarding should be up.
That’s it, have fun.
SSH tunneling is also sometimes used to bypass firewalls where certain ports are blocked.
The figure below represents the network setup at my workplace where the only port available to use is SSH port 22. By implementing portwarding over ssh I am able to port forward Oracle traffic over port 22 to my Oracle DB database running on my private VM with host only networking enabled.
In this post I will show you how to apply SSH tunneling using the windows SSH client Putty. I’ll cover the Linux implementation in my future post.
You will need Putty to get started. Putty is a popular free win32 based SSH/Telnet client. Obtain the latest version 0.59 at the homepage.
Putty Home | Putty Download
Run Putty, key in the address for your Linux box. In this example “10.99.34.6″ “Pandora” is the Linux box hosting VM and on the VM “192.168.66.100″ the is an Oracle database running on RHEL 3. The VM is setup with host only networking so it has no access beyond the host machine “Pandora”.
Look for the SSH tree entry in the menu to the left. Expand it and go to “Tunnels”.
Fill the the required information and click add.
Source Port: 1521
Destination: 192.168.66.100:1521
“Source port” is the port Putty will listen on for incoming connections.
“Destination” is the destination port we are trying to access. In this example the Oracle listener is listening on port 1521 for incoming traffic so we use that.
“1521″ is the standard Oracle listener port.
Remember to save the session in the session page.
Open Putty and login to the Linux box “Pandora” and port forwarding should be up.
That’s it, have fun.
Subscribe to:
Posts (Atom)